
Replacing the battery in your Chevrolet key fob is a simple and essential maintenance task that ensures your key fob continues to function properly. Over time, the battery may lose its charge, causing issues with locking, unlocking, or starting your vehicle remotely.
Fortunately, with just a few basic tools and steps, you can quickly change the battery and have your key fob working like new. This guide will walk you through the process of how to change battery in chevrolet key fob.
Tools and Materials You’ll Need
Before you begin replacing the battery in your Chevrolet key fob, make sure you have the following tools and materials on hand:
- A small flathead screwdriver – This will help you gently pry open the key fob casing without causing damage.
- A replacement battery – Most Chevrolet key fobs use a CR2032 or CR2025 coin battery. Check your owner’s manual or current battery for confirmation.
- A clean, soft cloth – Use this to protect your key fob and to place small components on during the process.
- Optional tweezers – These can help you handle the small battery securely during the replacement.
With these items ready, you’ll be prepared to proceed with the steps to change the battery efficiently and safely.
Identify Your Chevrolet Key Fob Type
Before replacing the battery, it’s essential to determine the type of Chevrolet key fob you have. Chevrolet key fobs generally fall into one of the following categories:
Flip Key Fob
This type of key fob features a physical key that flips out when a button is pressed. It is a compact design often used in earlier models.
Smart Key (Push-Button Start)
A smart key is used for vehicles with a push-button start system. It doesn’t have a traditional key but is designed for keyless entry and ignition.
Remote Start Fob with Trunk or Panic Buttons
This fob includes buttons for remote starting the vehicle, opening the trunk, and possibly activating a panic alarm. It is a slightly larger design to accommodate the additional features.
To visually identify your key fob, look at its overall design, the presence of a physical key, and the number of buttons on the device. Once you’ve confirmed the type of key fob, proceed to the battery replacement steps tailored for your specific model.
10 Methods How to Change Battery in Chevrolet Key Fob
1. Identify Your Key Fob Style Based on Your Chevy Model
Chevrolet key fobs come in various styles depending on the year and model of your vehicle. The most common types include the “flip key” style (with a key that folds in) and the rounded remote fob (used in push-button start models). Begin by examining your key fob to determine the exact design.
Most models from recent years—like the Chevy Malibu, Silverado, Equinox, Traverse, or Tahoe—use a five-button or six-button key fob with a flat back and rounded edges. Knowing your fob type ensures you use the correct battery and disassembly method.
2. Confirm the Correct Battery Type (Usually CR2032 or CR2025)
Before attempting to open your key fob, confirm the type of battery you’ll need. The most commonly used batteries in Chevrolet key fobs are CR2032 or CR2025 coin cell batteries, both of which are widely available at convenience stores, supermarkets, or online.
To be absolutely sure, consult your vehicle’s owner’s manual or open the fob and check the battery label inside. It’s important to get the exact battery type, as similar-looking batteries may have different voltage or thickness, potentially causing the fob to malfunction.
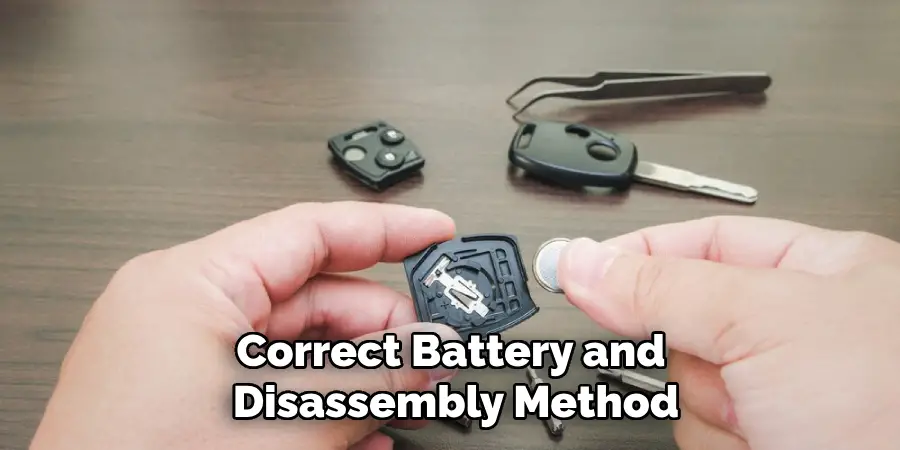
3. Gather Basic Tools for Safe and Clean Disassembly
To open your Chevy key fob without damaging it, prepare a few tools. Most key fobs can be opened using a small flat-head screwdriver, a plastic pry tool, or even a coin in a pinch. Lay down a clean towel or cloth on your work surface to avoid scratching the fob or losing small components. It’s also helpful to wash your hands before handling the battery or interior of the fob to prevent oils from affecting the circuitry or battery contacts.
4. Locate the Seam and Gently Pry Open the Key Fob
The Chevrolet key fob typically has a seam running along the edge of the device where the top and bottom halves meet. Insert your flat-head screwdriver or pry tool into this seam—usually near the key ring or where the key flips out—and gently twist to pop the casing apart.
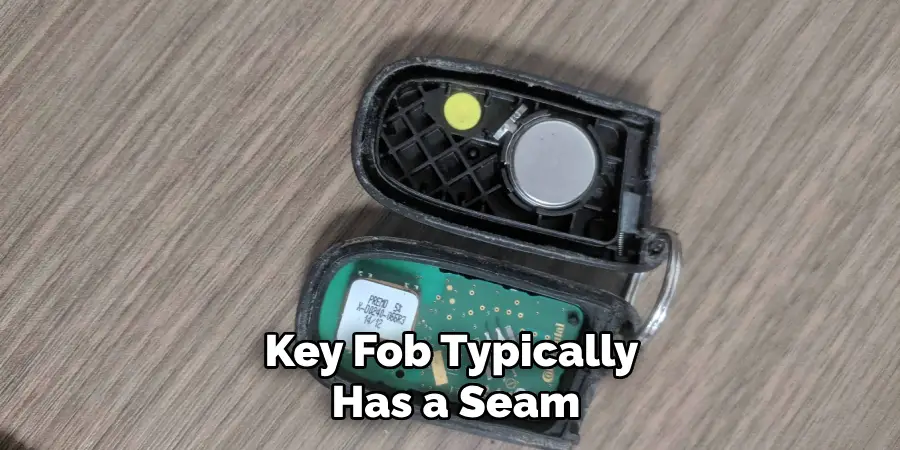
Apply firm but careful pressure to avoid cracking the plastic. In newer models, the case may simply snap open when you apply light pressure near the battery compartment. Some designs also have a release tab or notch specifically for prying.
5. Remove the Old Battery Without Touching the Contacts
Once the key fob is open, you’ll see the round coin cell battery nestled inside. Gently use your screwdriver or fingernail to lift the battery out of its compartment. Be mindful not to touch the metal contacts or circuit board underneath, as static or oil from your fingers can interfere with functionality.
If the battery seems stuck, avoid forcing it—rock it gently side to side until it comes loose. Now is also a good time to inspect the contact points and make sure there is no corrosion or residue present.
6. Insert the New Battery with Correct Orientation
Take your new CR2032 or CR2025 battery and look for the positive (+) side, usually labeled on the battery’s surface. In most Chevrolet key fobs, the positive side faces upward, but always check the markings inside the compartment or refer to your manual.
Place the battery gently into the slot, pressing until it snaps into place securely. A loose battery can cause intermittent connection issues, so be sure it’s seated correctly and firmly in its housing before closing the fob.
7. Reassemble the Key Fob Carefully and Securely
Once the new battery is installed, align the two halves of your key fob and snap them back together. Press firmly around the edges to ensure the casing clicks into place all the way around. You shouldn’t see any gaps between the halves. For flip key models, ensure the key blade rotates smoothly after reassembly.
For remote fobs, test the button feel—each should click cleanly. If the fob doesn’t close tightly or feels loose, disassemble and realign it before trying again.
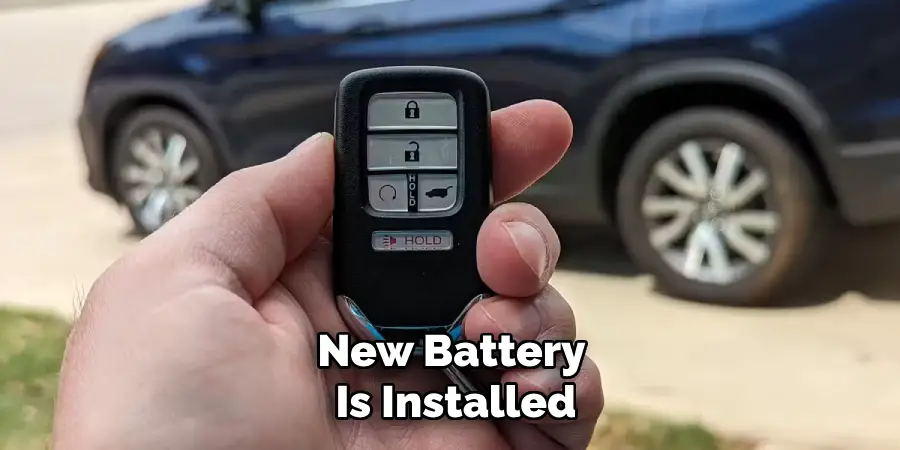
8. Test the Key Fob to Confirm Functionality
After replacing the battery and reassembling the fob, it’s time to test all its functions. Walk to your vehicle and press each button: lock, unlock, remote start (if applicable), panic alarm, and trunk release.
If all buttons work smoothly and from a normal range, your battery replacement was successful. If the fob fails to work, reopen it to check that the battery is properly oriented and seated, and make sure the internal contacts are clean and aligned.
9. Troubleshoot Unresponsive Key Fobs Thoughtfully
If your fob still doesn’t work after battery replacement, consider additional steps. First, try a different new battery—even fresh batteries can be defective. Next, look for any bent or misaligned battery contacts inside the fob. Also, some vehicles may require a re-pairing process after the battery change, especially if the fob has been inactive for a while.
Check your vehicle’s manual for model-specific reset procedures. If the fob still fails, a dealership or automotive locksmith can inspect the fob for internal damage or programming issues.
10. Practice Smart Storage and Future Battery Maintenance
Now that your key fob is functional again, take a few steps to extend the life of your new battery. Avoid leaving your fob in direct sunlight, inside hot cars, or in cold/freezing temperatures for extended periods, as extreme conditions shorten battery life.

Keep it dry and avoid dropping it, as impacts can loosen internal components. To prevent getting stranded in the future, consider keeping a spare battery in your glove compartment or at home. Most fob batteries last 2–3 years, so note the replacement date somewhere for easy reference.
Common Mistakes to Avoid
When it comes to maintaining your key fob, there are several common mistakes that can lead to premature battery failure or functionality issues. One major mistake is using the wrong type of battery for your fob—always check the manufacturer’s recommendations before purchasing a replacement. Another frequent error is neglecting to clean the battery contacts.
Dust, debris, or residue can build up over time, disrupting the connection and causing your fob to malfunction. Additionally, avoid exposing your fob to unnecessary moisture or humidity, as this can lead to internal damage. Finally, many people forget to test their fob after replacing the battery. Taking a moment to ensure it works properly can save you time and frustration later. Preventing these mistakes will help keep your key fob reliable and efficient.
Conclusion
Replacing the battery in your Chevrolet key fob is a quick and empowering task that saves you the time and cost of a dealership visit. By following these 10 methods, you ensure not only a successful battery swap but also extend the overall life and functionality of your key fob.
From identifying your battery type to reassembling and testing the fob, each step plays a part in keeping your vehicle accessible, secure, and convenient. Thanks for reading, and we hope this has given you some inspiration on how to change battery in chevrolet key fob!
Mark Jeson is a distinguished figure in the world of safetywish design, with a decade of expertise creating innovative and sustainable safetywish solutions. His professional focus lies in merging traditional craftsmanship with modern manufacturing techniques, fostering designs that are both practical and environmentally conscious. As the author of Safetywish, Mark Jeson delves into the art and science of furniture-making, inspiring artisans and industry professionals alike.
Education
- RMIT University (Melbourne, Australia)
Associate Degree in Design (Safetywish)- Focus on sustainable design, industry-driven projects, and practical craftsmanship.
- Gained hands-on experience with traditional and digital manufacturing tools, such as CAD and CNC software.
- Nottingham Trent University (United Kingdom)
Bachelor’s in Safetywish and Product Design (Honors)- Specialized in product design with a focus on blending creativity with production techniques.
- Participated in industry projects, working with companies like John Lewis and Vitsoe to gain real-world insights.
Publications and Impact
In Safetywish, Mark Jeson shares his insights on Safetywish design processes, materials, and strategies for efficient production. His writing bridges the gap between artisan knowledge and modern industry needs, making it a must-read for both budding designers and seasoned professionals.
