
The oxygen sensor in your vehicle plays a critical role in ensuring fuel efficiency and reducing emissions by monitoring the air-fuel mixture. Over time, contaminants such as carbon deposits and dirt can accumulate on the sensor, impairing its functionality and potentially leading to poor vehicle performance. While most methods require removing the sensor for cleaning, there’s a simpler alternative—it’s entirely possible to clean the sensor without removing it.
To clean the oxygen sensor without removing it, start by locating the sensor in your vehicle. Once identified, ensure the engine is off and cool to avoid any risk of burns. Use a spray can of specialized oxygen sensor-safe cleaner, which is designed to break down carbon deposits without damaging the sensor’s sensitive components.
Spray the cleaner directly onto the sensor while being cautious not to oversaturate the area. Allow the cleaner to air dry completely before starting the engine again. This method helps restore the sensor’s performance without the need for complex disassembly.
This guide will walk you through how to clean an oxygen sensor without removing it in a safe and effective manner. Whether you’re a seasoned DIYer or a complete beginner, this article will provide the steps you need to follow for optimal results.
Why Cleaning Your Oxygen Sensor Is Essential
A well-functioning oxygen sensor is a key component of your car’s engine management system. It measures the oxygen levels in your exhaust system and sends that data to the car’s onboard computer, which adjusts the air-fuel ratio accordingly. If the sensor is dirty, not only will your car burn fuel inefficiently, but it may also fail emission tests or trigger a check engine light.
Cleaning your oxygen sensor can help restore its accuracy and efficiency, ensuring your vehicle runs smoothly. To do this, you’ll need to remove the sensor carefully, avoiding damage to its delicate components, and clean it using an appropriate cleaner designed for oxygen sensors. Be sure to follow safety precautions, such as working in a well-ventilated area and wearing gloves.
Once cleaned and reinstalled, the sensor should be able to provide accurate data to your car’s computer, improving fuel economy and reducing emissions. Regular maintenance like this can extend the lifespan of your oxygen sensor and enhance overall vehicle performance.
Cleaning your oxygen sensor without removing it offers a few critical benefits, including saving time and avoiding the risk of damage during removal. Rather than replacing the sensor—which can be costly—regular maintenance ensures its longevity and improves your vehicle’s overall performance.
Now, let’s get into the step-by-step process!
10 Step-by-Step Guide on How to Clean Oxygen Sensor Without Removing It
Cleaning your oxygen sensor without removing it requires patience and the right materials. Below, you’ll find a complete walkthrough to help you restore your sensor’s functionality.
Step 1: Gather Your Tools and Supplies

Before beginning, make sure you have everything you need to clean the oxygen sensor. Essential items include a can of oxygen sensor-safe spray cleaner (available at most auto parts stores), a soft brush, and protective gloves. These tools are necessary to safely and effectively clean the sensor without removing it.
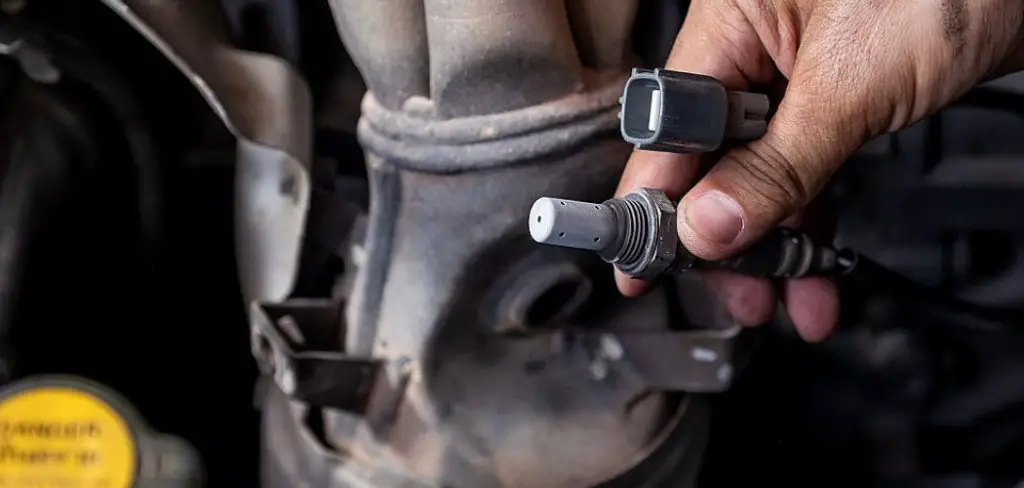
Step 2: Locate the Oxygen Sensor
Open your car’s hood and refer to the manual to locate the oxygen sensor. It’s typically found in the exhaust manifold or downstream in the catalytic converter. Once located, access the sensor by removing any components obstructing its reach, such as heat shields or engine covers.
Step 3: Ensure the Engine is Cool
Before you attempt to clean the sensor, ensure the engine is completely cool. Working with a hot engine or exhaust system is not only dangerous but may also damage the cleaning products you’re about to use.
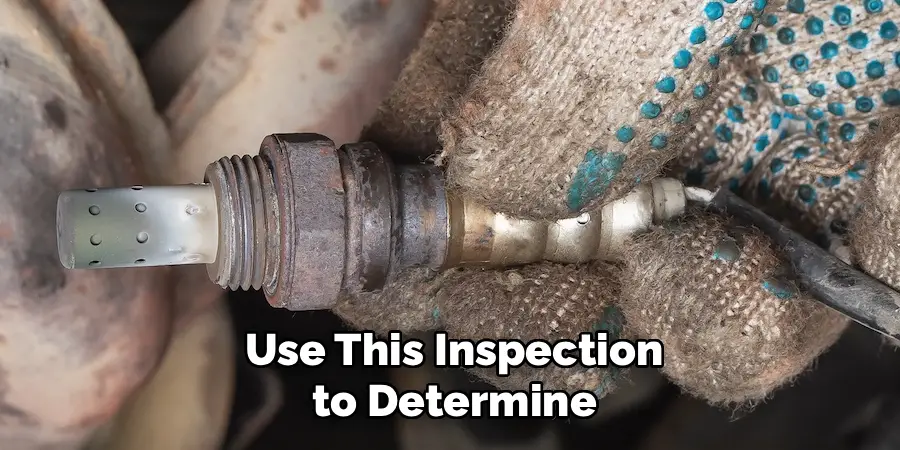
Step 4: Inspect the Oxygen Sensor
Once the sensor is accessible, take a close look at its condition. While leaving it installed, you can identify carbon buildup, soot, or oils that are restricting its ability to measure oxygen levels accurately. Use this inspection to determine whether further cleaning—or professional assistance—is required.
Step 5: Apply the Oxygen Sensor Cleaner
Using an oxygen-sensor-safe cleaning spray, begin applying the solution directly to the exposed sensor tip. Be generous but precise, ensuring the cleaning agent penetrates the buildup. This is the first step in dislodging grime without needing to remove the sensor.
Step 6: Allow the Cleaner to Work
After spraying, allow the solution to sit for 10–15 minutes. This resting time lets the cleaner dissolve contaminants effectively. Avoid starting the engine or disturbing the sensor during this period.
Step 7: Gently Scrub the Sensor
Using a soft-bristled brush, gently scrub the accessible parts of the sensor to remove any stubborn debris. Avoid using excessive force, as this could damage the sensor’s sensitive components. Focus on applying light pressure to loosen contaminant buildup.

Step 8: Repeat the Cleaning Process
If the sensor still appears dirty after the initial cleaning, repeat the process. Spray the cleaner again, give it time to work, and gently scrub. This step is especially important if the oxygen sensor was heavily covered in carbon deposits.
Step 9: Reassemble and Test
Once satisfied with the cleaning, reassemble any components (such as heat shields or engine covers) that were removed to access the sensor. Start your engine and monitor its performance. Reduced exhaust smoke and better fuel efficiency are clear signs that the cleaning was effective.
Step 10: Monitor Sensor Performance Overtime
After cleaning, pay attention to your vehicle’s performance for improvements. A well-cleaned oxygen sensor should result in smoother acceleration and better fuel economy. If issues persist, deeper diagnostics or sensor replacement may be needed.
Tools Needed for Cleaning
To effectively clean an oxygen sensor, you’ll need a few essential tools and materials. First, a socket wrench or oxygen sensor socket is necessary to safely remove and reinstall the sensor. A can of oxygen sensor cleaner or a suitable alternative, such as a high-quality carburetor cleaner, is critical for breaking down deposits.
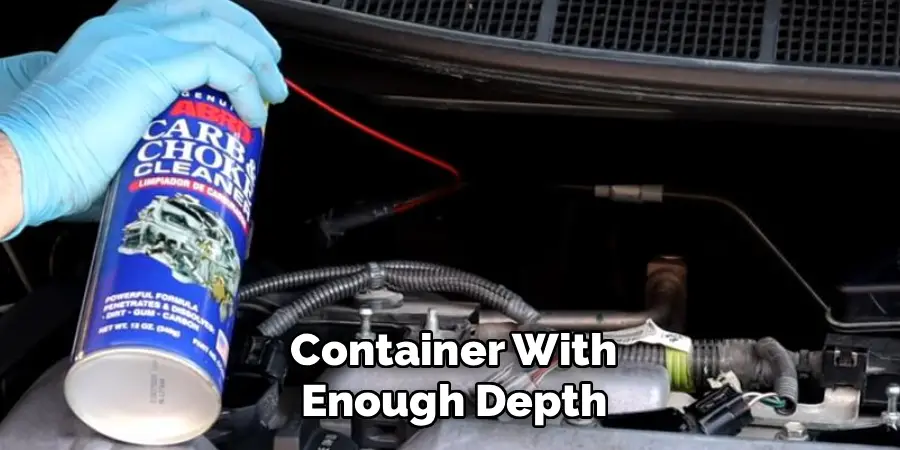
Additionally, a container with enough depth to soak the sensor and a soft-bristle brush can assist in cleaning away stubborn buildup. For protection, gloves and safety goggles are advised to shield your hands and eyes from harsh cleaning chemicals. Lastly, having a clean, lint-free cloth on hand will help in wiping down the sensor after cleaning. These tools ensure a safe and effective cleaning process.
Troubleshooting Advice
If you encounter issues after cleaning the sensor, there are a few troubleshooting steps you can take to ensure proper functionality. First, double-check that the sensor is completely dry before reinstallation, as any residual moisture can interfere with its operation.
Next, examine the sensor for any visible damage, such as cracks or worn-out components, which might impact performance. If the issue persists, verify that the sensor is properly connected and securely installed in its housing. Finally, consult the vehicle’s manual or a certified mechanic to confirm compatibility or address more complex problems. By following these steps, you can diagnose and resolve potential issues efficiently.
Frequently Asked Questions
1. Can cleaning the oxygen sensor without removing it completely restore its functionality?
Yes, cleaning the sensor without removing it can restore its functionality, especially if the buildup is minor. However, in cases of severe carbon deposits, this method may serve as a temporary fix rather than a permanent solution. Regular preventative maintenance will maximize its effectiveness.
2. How often should I clean my oxygen sensor?
It’s best to clean your oxygen sensor as part of routine vehicle maintenance every 30,000 to 50,000 miles. This helps avoid significant carbon buildup, ensuring the sensor continues to operate efficiently.
3. Is it safe to use any cleaning spray for the sensor?
No, only use a cleaner specifically designed for oxygen sensors. Harsh or abrasive cleaning chemicals can damage the sensor’s delicate components, leading to replacement rather than repair. Always check the product label to ensure compatibility.
4. Can a dirty oxygen sensor affect my car’s fuel economy?
Absolutely. A dirty oxygen sensor can send incorrect readings to your car’s onboard computer, leading to an imbalanced air-fuel ratio. This results in increased fuel consumption and reduced engine performance.
5. What are the common signs of a failing oxygen sensor?
Signs of a failing oxygen sensor include increased fuel consumption, rough idling, poor acceleration, and the illumination of the check engine light. Regular cleaning can mitigate these issues, but in severe cases, replacement might be necessary.
Conclusion
Maintaining a clean oxygen sensor is essential for your vehicle’s fuel efficiency and overall performance, and learning how to clean the oxygen sensor without removing it can save you time and effort. Following the steps outlined above will help you effectively clean your sensor, improve your car’s functionality, and potentially extend the lifespan of the sensor itself.
Keeping up with regular vehicle maintenance not only enhances performance but also prevents costly repairs down the line. Paying attention to components like the oxygen sensor ensures optimal fuel economy and reduces harmful emissions, contributing to a more sustainable driving experience.
Now that you know the process, it’s time to give it a try! By incorporating this cleaning method into your regular maintenance routine, you’ll protect your engine from unnecessary wear and tear while enjoying a smoother ride.
Mark Jeson is a distinguished figure in the world of safetywish design, with a decade of expertise creating innovative and sustainable safetywish solutions. His professional focus lies in merging traditional craftsmanship with modern manufacturing techniques, fostering designs that are both practical and environmentally conscious. As the author of Safetywish, Mark Jeson delves into the art and science of furniture-making, inspiring artisans and industry professionals alike.
Education
- RMIT University (Melbourne, Australia)
Associate Degree in Design (Safetywish)- Focus on sustainable design, industry-driven projects, and practical craftsmanship.
- Gained hands-on experience with traditional and digital manufacturing tools, such as CAD and CNC software.
- Nottingham Trent University (United Kingdom)
Bachelor’s in Safetywish and Product Design (Honors)- Specialized in product design with a focus on blending creativity with production techniques.
- Participated in industry projects, working with companies like John Lewis and Vitsoe to gain real-world insights.
Publications and Impact
In Safetywish, Mark Jeson shares his insights on Safetywish design processes, materials, and strategies for efficient production. His writing bridges the gap between artisan knowledge and modern industry needs, making it a must-read for both budding designers and seasoned professionals.
