
Motion sensor light switches are innovative devices designed to enhance energy efficiency and convenience in both residential and commercial settings. These switches automatically turn lights on when movement is detected and off after a set period of inactivity, significantly reducing unnecessary energy consumption.

The chief advantage of installing such a switch is its convenience, reducing the need to manually flip switches and thus creating a more seamless lighting experience. Commonly used in areas such as bathrooms, hallways, and garages, motion sensor light switches ensure that lights are only utilized when needed, thereby reducing energy expenses.
This article aims to be a comprehensive guide on how to install a motion sensor light switch, providing a step-by-step process to ensure safety and effectiveness during installation. Whether you are looking to improve energy efficiency or enhance the convenience of your lighting system, this guide will help you achieve your installation goals.
Choosing the Right Motion Sensor Light Switch
Types of Motion Sensor Switches
There are several types of motion sensor light switches available, each catering to different needs and preferences. Passive infrared (PIR) switches detect body heat and are suitable for areas with minimal obstructions, like hallways and entryways. They are energy-efficient and generally reliable but may have a limited detection range.
Ultrasonic switches, on the other hand, emit sound waves to detect movement and can penetrate obstacles, making them ideal for spaces with irregular layouts or obstructions, such as offices with cubicles. However, they are often more sensitive, leading to false triggers. Dual-technology switches combine PIR and ultrasonic mechanisms, aiming to balance energy efficiency and range, though they may come at a higher cost.
Key Features to Look For
Certain features can significantly enhance functionality and compatibility when selecting a motion sensor light switch. Adjustable sensitivity settings allow you to customize the detection range, reducing false activations. Timer settings allow you to determine how long lights should remain after detecting motion.

Manual override options are also useful, enabling you to operate the switch like a conventional light switch when needed. It’s crucial to ensure compatibility with your home’s existing wiring and check the switch’s electrical load capacity to avoid overloading your circuit. These considerations will help ensure a successful installation that meets your needs.
Tools and Safety Precautions
Necessary Tools
Before beginning the installation of your motion sensor light switch, gather the essential tools to ensure a smooth process. You’ll need a screwdriver to remove existing switch plates and mount the new switch, a voltage tester to check for live wires, wire strippers to remove insulation from electrical wires, and pliers for gripping and twisting wires.
It’s also beneficial to read the product manual thoroughly to understand specific requirements and compatibility notes pertaining to your motion sensor light switch.
Safety Measures
Safety should be a top priority when handling electrical wiring. Begin by turning off the power to the circuit at the breaker box to prevent any electrical shocks. Use a voltage tester to ensure that wires are not live before you start working.
Familiarize yourself with basic electrical safety practices to mitigate risks, such as wearing rubber-soled shoes, using insulated tools, and avoiding metal jewelry. Prioritize these precautions to ensure a safe and effective installation.
Preparing to Install the Motion Sensor Light Switch
Removing the Existing Switch
To start the installation of your motion sensor light switch, you must first remove the existing switch. Start by unscrewing the wall plate using a screwdriver, then detach it to reveal the switch underneath. Carefully unscrew the switch from the electrical box and gently pull it out, ensuring that it hangs freely without straining the wires.
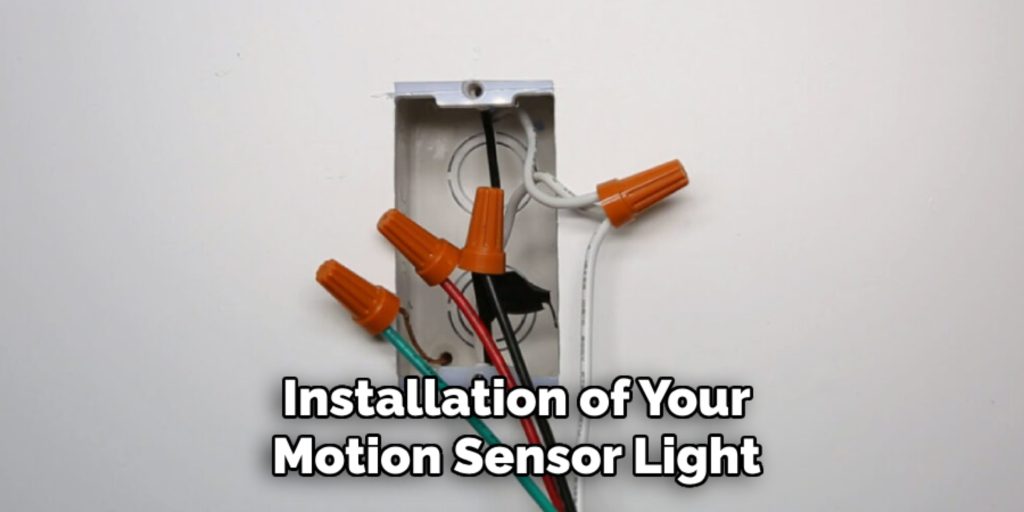
Labeling the wires before disconnecting them is crucial, as this will assist you when wiring the new switch. Use small pieces of masking tape to label each wire, or take a photo with your smartphone for easy reference. This step ensures a smoother installation process, preventing confusion about which wire connects to which terminal on the new switch.
Identifying and Understanding the Wiring
In this step, identifying the existing wires is essential for proper installation. Typically, you will encounter four main types of wires: line (live), load, ground, and neutral. The line wire supplies power from the breaker box, while the load wire carries power to the light fixture.
The ground wire, usually green or bare, provides a safe path for electricity in the event of a fault. Some installations may not have a neutral wire, which can pose a challenge since some motion sensor switches require one. If there’s no neutral wire in your switch box, you may need to select a model that does not require it or consult an electrician for further guidance.
How to Install a Motion Sensor Light Switch: Installing the Motion Sensor Light Switch
Connecting the Wires to the New Switch
To connect the motion sensor light switch, identify the terminals on the new switch. Typically, they will be labeled for easy identification, indicating where the line, load, ground, and neutral wires should be connected. Start by attaching the line wire to the terminal marked as ‘LINE,’ ensuring it’s securely fastened. Then, connect the load wire to the ‘LOAD’ terminal.
Proceed with the ground wire, connecting it to the terminal signified by a green screw or the ground symbol. The neutral wire should be attached to the ‘NEUTRAL’ terminal if your switch requires it. Once all wires are connected, double-check that the screws are tightly secured to prevent any loose connections that could lead to malfunction. Ensure that none of the wires are exposed outside the terminal, as this could pose a safety hazard.

Mounting the Switch and Securing the Wall Plate
After the wires are securely connected, carefully push them back into the electrical box, ensuring they are neatly tucked away to avoid pinching or damage. Align the switch with the mounting holes on the box and secure it with screws using a screwdriver. Take care to ensure the switch is level and firmly in place.
Once the switch is mounted, position the wall plate over it, aligning it with the screw holes. Fasten the wall plate with screws, ensuring it is flush against the wall for a finished look. Check that everything is tightly secured to prevent any movement. After securing the wall plate, restore power at the breaker box and test the switch to ensure everything is functioning correctly.
Testing the Motion Sensor Switch
Turning on the Power and Initial Testing
After installation, it’s time to test your new motion sensor light switch. Begin by turning the power back on at the breaker box. Once the power is restored, test the switch by walking in front of the sensor to see if the lights turn on instantly. This initial test will confirm that the motion sensor correctly detects movement and that the wiring is properly connected, ensuring your switch operates as expected.
Troubleshooting Issues
If the lights do not turn on after testing, double-check all wire connections to ensure they are secure and tight. Loose or incorrect connections are common culprits for malfunction. Verify that your motion sensor switch is compatible with your existing electrical setup, as some models require specific wiring configurations. If problems persist, consult the product manual for additional troubleshooting guidance or seek professional help from an electrician.
Adjusting the Motion Sensor Settings
Adjusting Sensitivity and Timer Settings
Accessing your motion sensor switch’s sensitivity and timer settings typically involves removing the wall plate or accessing small dials on the switch itself. The sensitivity setting determines how easily motion is detected in the room. For high-traffic areas, like a hallway, set the sensitivity higher to ensure the lights activate promptly as people pass through.
Conversely, in low-traffic areas, like a laundry room, a lower sensitivity setting may suffice to prevent unwanted activation. Timer settings control how long the lights remain on after motion is detected. A shorter timer is recommended for areas where quick on-and-off functionality is unnecessary, while longer durations might be more practical for spaces where people might linger.
Testing and Fine-Tuning the Settings
To fine-tune your motion sensor settings, conduct a series of tests to ensure the range and timer suit your needs. Walk into the room to see if the lights activate immediately, and adjust the sensitivity to avoid false triggers from minor movements or pets.
Test various timer durations to see what works best for your usage patterns and adjust accordingly to optimize energy efficiency. Striking a balance between responsiveness and minimizing energy consumption is key, ensuring that the lights only stay on as long as necessary for safety and convenience.

Conclusion
In conclusion, learning how to install a motion sensor light switch involves several crucial steps, from identifying and connecting the right wires to setting up the switch and adjusting its sensitivity and timer settings. These switches offer significant convenience and energy savings, making them a beneficial addition to any home.
However, it’s vital to adhere to safety precautions throughout the process and consider consulting a professional for any complex electrical work. With careful installation and adjustment, you’ll enjoy the seamless operation that enhances security and efficiency in your living spaces.
Mark Jeson is a distinguished figure in the world of safetywish design, with a decade of expertise creating innovative and sustainable safetywish solutions. His professional focus lies in merging traditional craftsmanship with modern manufacturing techniques, fostering designs that are both practical and environmentally conscious. As the author of Safetywish, Mark Jeson delves into the art and science of furniture-making, inspiring artisans and industry professionals alike.
Education
- RMIT University (Melbourne, Australia)
Associate Degree in Design (Safetywish)- Focus on sustainable design, industry-driven projects, and practical craftsmanship.
- Gained hands-on experience with traditional and digital manufacturing tools, such as CAD and CNC software.
- Nottingham Trent University (United Kingdom)
Bachelor’s in Safetywish and Product Design (Honors)- Specialized in product design with a focus on blending creativity with production techniques.
- Participated in industry projects, working with companies like John Lewis and Vitsoe to gain real-world insights.
Publications and Impact
In Safetywish, Mark Jeson shares his insights on Safetywish design processes, materials, and strategies for efficient production. His writing bridges the gap between artisan knowledge and modern industry needs, making it a must-read for both budding designers and seasoned professionals.
