
Programming your Honda garage door opener can greatly enhance your daily convenience and add a layer of modern functionality to your routine. Most contemporary Honda vehicles are equipped with the built-in HomeLink system, allowing seamless integration with a variety of garage door opener brands.
This feature helps streamline your entry and exit, eliminates the need for additional remote controls, and provides unmatched accessibility. Learning how to program Honda garage door opener is a simple process—one that rewards you with ease of use, improved safety, and professional-level performance right at your fingertips.
In this comprehensive guide, you’ll discover step-by-step instructions, practical tips, and expert insights to help you successfully set up your Honda’s HomeLink system to control your garage door and beyond.
Understanding the HomeLink System
The HomeLink system is an integrated transmitter found in most modern Honda vehicles, designed to replace traditional garage door remotes. This innovative technology is compatible with the vast majority of garage door openers on the market, including both standard and rolling code systems. With HomeLink, you gain the advantage of operating up to three devices—such as garage doors, gates, or even home lighting—directly from your car’s interior.
Honda models commonly equipped with HomeLink include the Accord, CR-V, Pilot, Ridgeline, Odyssey, and Civic, among others. Its universal compatibility, intuitive design, and multi-device control capabilities make the HomeLink system a standout feature for drivers seeking both convenience and security.
Some key features of the HomeLink system include:
- Built-in Versatility: Program up to three devices at once.
- Convenience: Say goodbye to cluttered visors or lost remotes.
- Secure Integration: Rolling code compatibility ensures safe operation.
If your Honda is equipped with HomeLink, you’re already set up for a streamlined, connected experience.
Tools and Preparations Needed
Before you begin programming your Honda garage door opener, gather the necessary items to ensure a smooth process. While Honda’s HomeLink system is designed for user-friendly setup, proper preparation helps eliminate potential frustrations.
Essentials:
- The original garage door remote (with fresh batteries)
- Your vehicle’s owner’s manual (for reference)
- A step stool or ladder to access your garage door opener (if needed)
Optional:
- Smartphone and compatible app (for smart openers)
- Pen and paper (to jot down notes or codes during the process)
Before starting, check the battery life in your garage door remote. Low batteries can cause failed programming attempts. Additionally, ensure your garage door opener is in working condition and the area around your vehicle is clear for safety.
If you’re integrating with a smart garage system, you may need to follow additional manufacturer-specific steps—refer to both your Honda manual and the opener’s instructions for details.
Locating the HomeLink Buttons in Your Honda Vehicle
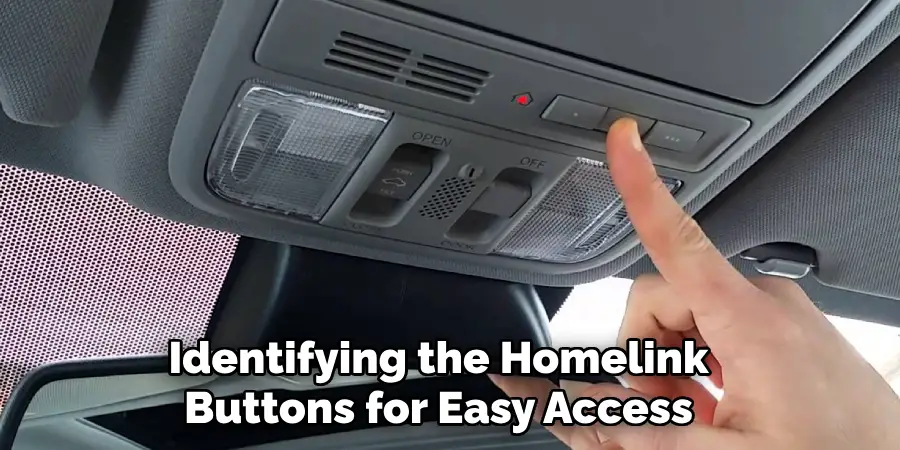
A critical first step in learning how to program your Honda garage door opener is identifying the HomeLink buttons for easy access during programming.
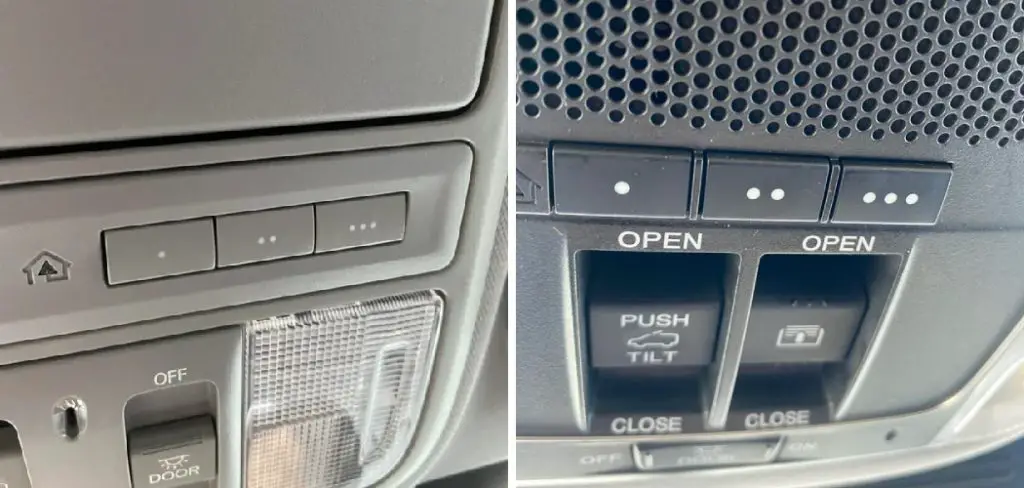
Most Honda vehicles place the HomeLink buttons on the overhead ceiling console, though you might also find them on the driver’s sun visor. In some models, the buttons may be set within the rearview mirror housing.
Button Layout and Identification:
- Typically, three buttons are grouped together and may be marked with a house icon.
- These buttons are unassigned until programmed and can each control a different device (for example: garage door, gate, or security lighting).
- An indicator light is usually located near the buttons and will respond during the programming and operation phases.
Take a quick moment to familiarize yourself with their locations to avoid any confusion during the process. Refer to your vehicle’s owner’s manual if needed for exact descriptions and visual aids.
Understanding the Buttons
Each HomeLink button in your Honda is programmable for individual devices. The operation is straightforward:
- First button: Commonly used for your primary garage door.
- Second/Third buttons: Programmed for a second garage door, gate, or even home automation systems.
The indicator light is crucial—it will blink or change color to confirm programming steps, successful activation, or to signal any issues during setup. Observing the light’s behavior is especially important as it provides feedback throughout the process.
Checking Compatibility with the Garage Door Opener
Not all garage doors and openers operate the same way, so compatibility checks are important before starting the programming process.
Step 1: Refer to Manufacturer Manuals
- Check your garage door opener’s manual or manufacturer’s website to confirm it supports HomeLink integration.
- Most openers manufactured after 1996 should be compatible but watch for exceptions.
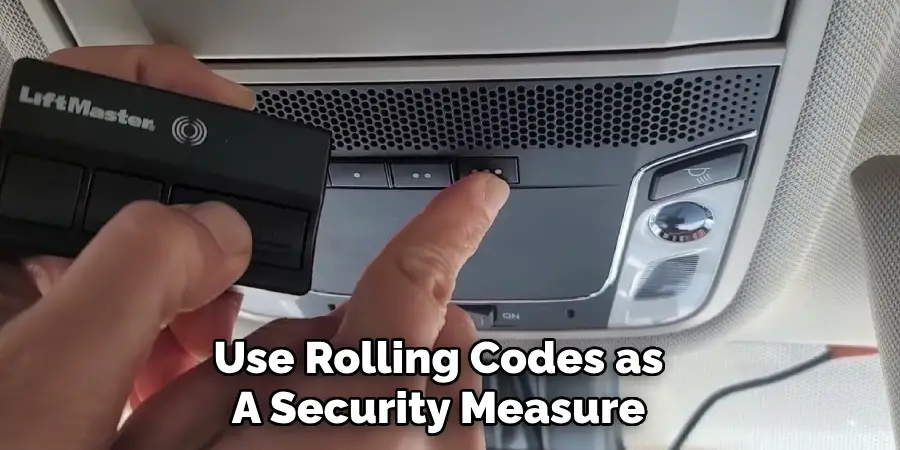
Step 2: Identify Rolling Code Technology
Many modern openers use rolling codes as a security measure, generating a new code with every operation. This can require additional programming steps.
- Identifying Rolling Code:
- Look for a “Learn” or “Smart” button on the opener motor unit itself—usually beneath a light cover.
- The presence of this button and the corresponding LED often means you have a rolling code system.
If you’re unsure, search your opener brand and model online or consult customer service. Verifying this detail in advance ensures you’ll follow the correct programming steps.
How to Program Honda Garage Door Opener: Programming Process
Ready to bring it all together? Here’s a clear, actionable guide on how to program your Honda garage door opener:
Step 1: Clear Existing HomeLink Codes
- Press and hold the first and third HomeLink buttons simultaneously.
- Keep both buttons pressed for about 20 seconds until the indicator light blinks rapidly.
- Release both buttons. The system is now clear and ready for new programming.
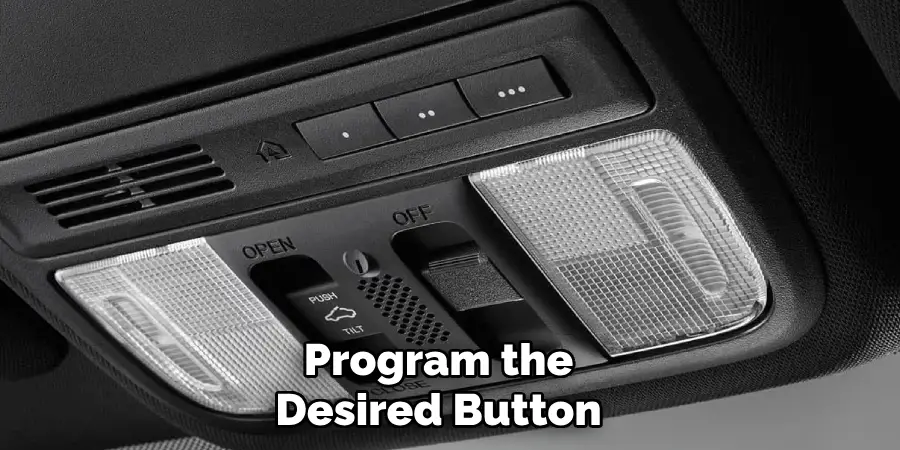
Step 2: Program the Desired Button
- Hold the garage door remote close (one to three inches) to the HomeLink buttons.
- Press and hold the remote’s open button and the HomeLink button you want to program at the same time.
- Continue holding until the indicator light on the Honda console changes from a slow blink to either a solid light or rapid blinking (usually takes about 20 seconds).
- Release both buttons.
Step 3: For Rolling Code Systems
If your garage door opener uses rolling codes, there’s one extra step:
- Press the “Learn” button on your garage door opener motor unit (you may need a step stool or ladder).
- You have 30 seconds to return to your vehicle.
- Press and hold the programmed HomeLink button for two seconds and release. Repeat this press/hold/release sequence up to three times.
- The garage door should now operate using your Honda’s HomeLink button.
Pro Tips for Success:
- Hold the buttons steadily and don’t release too soon—wait for the indicator light.
- If the indicator does not change after several tries, double-check the remote’s battery and your distance between devices.
Troubleshooting Common Issues
Even with clear instructions, occasional programming hitches can occur.
- Indicator Light Not Responding: Check the remote battery and confirm the HomeLink system was reset.
- Failure to Operate: Repeat the rolling code sequence or consult your vehicle and opener manuals.
- Inconsistent Performance: Re-clear all codes and restart the process, making sure you follow timing instructions carefully.
Testing the HomeLink System
After successful programming, it’s important to check that everything works as expected.
How to Test:
- Sit inside your Honda with the garage door in view.
- Press the programmed HomeLink button.
- Observe the garage door’s response—does it open, close, or remain idle?
If the Door Doesn’t Respond:
- Ensure you follow each programming step according to whether your opener uses rolling code technology.
- Try pressing the button again or holding for a few extra seconds.
- Confirm no interference from additional remotes or active HomeLink buttons.
- Reference the troubleshooting section above if persistent issues develop.
Testing solidifies your setup and assures you of reliable daily operation.
Reprogramming or Erasing Existing Codes
At times, you may need to erase or change HomeLink programming—perhaps you move, purchase a new opener, or want to assign a button to a new device.
Erasing All Codes:
- Hold down the first and third HomeLink buttons for at least 20 seconds until the indicator rapidly blinks.
- Release both buttons; all previous codes are erased.
Reprogramming a Single Button:
- Hold the desired HomeLink button until the light begins to flash slowly.
- Repeat the programming process with the new remote or device as described above.
You might want to reprogram when you move to a new house, replace your garage door opener, or wish to operate more than one garage or security device from your Honda. Each button can be uniquely programmed, making flexibility a strong advantage.
Advanced Features of the HomeLink System
HomeLink technology continues to evolve, offering more than just basic garage door operation.
Smart Features Include:
- Integration with Home Automation: Many new systems allow you to connect HomeLink to smart lighting, exterior gate systems, and even home alarm panels.
- Smartphone Compatibility: Certain HomeLink versions and connected garage door openers are controllable via smartphone apps, providing control and monitoring from virtually anywhere.
- Additional Devices: Program the extra buttons for security gates, home entryways, or remote lighting systems—customizing your Honda to your precise needs.
Check your vehicle’s owner’s manual and HomeLink’s website for a full list of compatible home automation products and expanded features.
Safety Tips for Programming Honda Garage Door Openers
Safety during setup is just as important as daily operation.
- Keep Children and Pets Away: Doors move automatically during programming; ensure no one is in the path.
- Position Your Vehicle Properly: Ideally, park outside the garage. If you must remain inside, keep the garage door open for proper ventilation.
- Organization: Lay out all required tools and remotes within reach before you begin.
Programming isn’t difficult, but taking a few minutes to safeguard the process means greater peace of mind.
Protecting User Data
If you ever sell or transfer your vehicle, it’s critical to erase all HomeLink memory codes.
- How: Hold the first and third buttons simultaneously for 20 seconds until the indicator blinks.
- This protects your personal security, ensures the new owner can program their own remotes, and prevents any lingering access to your home devices.
Conclusion
Programming your Honda garage door opener delivers extraordinary convenience and accessibility for daily routines. As you’ve seen, learning how to program Honda garage door opener is a straightforward process—one that puts you in control of your home’s security and access from the comfort of your vehicle.
By methodically following each step, you can enjoy the seamless integration offered by the HomeLink system, whether you’re reaching for the main garage door, a side gate, or home lighting. Return to this guide whenever you need to reprogram, troubleshoot, or add new devices, and relish the ease and reliability that comes with a fully synchronized garage door opener.
Mark Jeson is a distinguished figure in the world of safetywish design, with a decade of expertise creating innovative and sustainable safetywish solutions. His professional focus lies in merging traditional craftsmanship with modern manufacturing techniques, fostering designs that are both practical and environmentally conscious. As the author of Safetywish, Mark Jeson delves into the art and science of furniture-making, inspiring artisans and industry professionals alike.
Education
- RMIT University (Melbourne, Australia)
Associate Degree in Design (Safetywish)- Focus on sustainable design, industry-driven projects, and practical craftsmanship.
- Gained hands-on experience with traditional and digital manufacturing tools, such as CAD and CNC software.
- Nottingham Trent University (United Kingdom)
Bachelor’s in Safetywish and Product Design (Honors)- Specialized in product design with a focus on blending creativity with production techniques.
- Participated in industry projects, working with companies like John Lewis and Vitsoe to gain real-world insights.
Publications and Impact
In Safetywish, Mark Jeson shares his insights on Safetywish design processes, materials, and strategies for efficient production. His writing bridges the gap between artisan knowledge and modern industry needs, making it a must-read for both budding designers and seasoned professionals.
