
The Mass Air Flow (MAF) sensor is a critical component in your vehicle’s intake system. It measures the amount of air entering the engine, allowing the engine control unit to determine the correct fuel-to-air ratio. Over time, the MAF sensor can accumulate dirt or become faulty, leading to performance issues such as poor fuel efficiency or rough idling. Removing and cleaning or replacing the MAF sensor is a straightforward process that can help restore your vehicle’s performance. This guide explores the key aspects of how to remove maf sensor.
What Is a MAF Sensor?
A MAF (Mass Air Flow) sensor is an essential component in a vehicle’s fuel injection system. It is responsible for measuring the amount of air entering the engine, providing critical data to the engine control unit (ECU). This information allows the ECU to calculate and adjust the fuel injection to achieve the optimal air-to-fuel ratio, ensuring efficient combustion and optimal engine performance.
MAF sensors come in two main types—hot wire and vane meter—though the hot wire design is more commonly used in modern vehicles due to its accuracy and reliability. A properly functioning MAF sensor is crucial for maintaining good fuel economy, reducing emissions, and ensuring smooth engine operation.
Symptoms of a Faulty MAF Sensor
A malfunctioning mass airflow (MAF) sensor can lead to several noticeable issues in a vehicle’s performance. One common symptom is poor fuel economy, as the incorrect air-to-fuel ratio can cause the engine to consume more fuel than necessary. You may also experience rough idling or stalling, particularly when the car is at a stop or during low-speed driving.
Additionally, a faulty MAF sensor can trigger the check engine light, and diagnostic trouble codes related to the air intake system may be stored in the vehicle’s ECU. Other symptoms include hesitation or jerking during acceleration, reduced engine power, and increased emissions due to inefficient combustion. Addressing a faulty MAF sensor promptly is essential to prevent further damage to the engine and ensure safe vehicle operation.
Tools and Materials Needed
To properly diagnose and replace a faulty Mass Air Flow (MAF) sensor, you will need the following tools and materials:
- OBD-II Scanner: For retrieving diagnostic trouble codes and verifying that the MAF sensor is the issue.
- Replacement MAF Sensor: Ensure you have the correct part compatible with your vehicle’s make and model.
- Screwdrivers: Typically, a flathead or Phillips screwdriver may be required to loosen clamps or screws securing the sensor.
- Ratchet and Socket Set: For removing any bolts that may hold the MAF sensor in place.
- Gloves: To protect your hands and maintain cleanliness during the procedure.
- Cleaner for MAF Sensors (if cleaning instead of replacing): Only use cleaner specifically designed for MAF sensors to avoid damage.
- Shop Towels or Rags: For cleaning or wiping debris around the sensor area.
Having these tools and materials on hand will help ensure the process is efficient and straightforward.
10 Methods How to Remove MAF Sensor
1. Prepare Your Workspace and Gather Necessary Tools
Before beginning the removal process, prepare a clean, well-lit workspace with easy access to the engine bay. Gather essential tools including a screwdriver (usually Phillips or flathead), Torx bits if applicable, and possibly a socket set depending on your vehicle model. Wearing gloves and safety glasses is recommended to protect your hands and eyes from dirt and debris. Having the right tools at hand and a tidy area ensures a smooth and efficient removal process without losing screws or damaging parts.

2. Disconnect the Battery to Prevent Electrical Hazards
Safety is paramount when working with electronic components like the MAF sensor. Begin by disconnecting the negative terminal of the vehicle battery using a wrench or socket. This prevents electrical shorts, accidental sensor activation, or ECU damage during removal. Wait a few minutes after disconnecting to allow any residual power to dissipate. This precaution safeguards you and the vehicle’s electrical system throughout the procedure.
3. Locate the MAF Sensor in the Engine Bay
The MAF sensor is typically positioned between the air filter box and the intake manifold, attached to the air intake duct. Refer to your vehicle’s owner manual or repair guide to locate it precisely. Recognizing the sensor’s location helps you plan the removal approach, noting how it is mounted and connected. Visual familiarity reduces the chance of damaging surrounding components during disassembly.
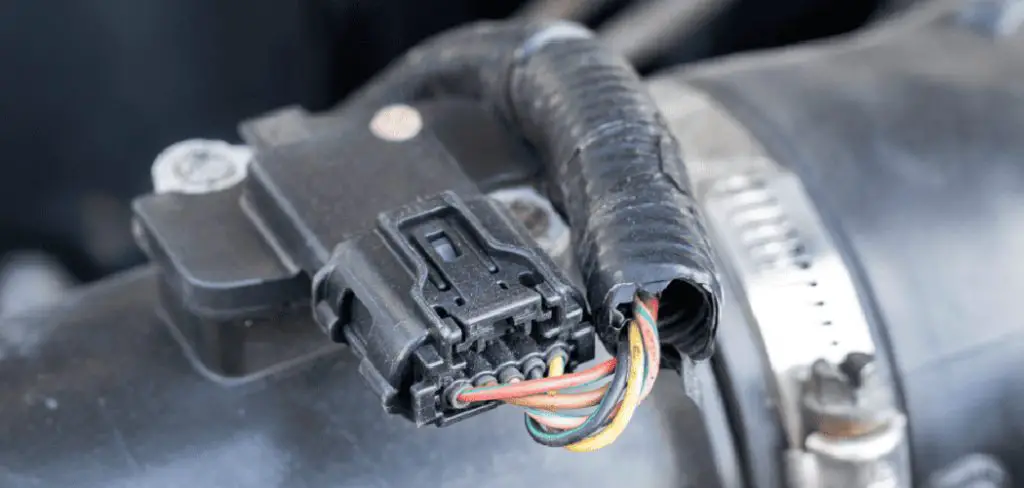
4. Disconnect the Electrical Connector
Carefully unplug the electrical connector from the MAF sensor. These connectors usually have a locking tab or clip that must be depressed or slid to release. Use gentle pressure to avoid breaking the plastic clip. If the connector is stubborn, applying a small amount of penetrating lubricant or gently wiggling can help. Disconnecting the wiring harness correctly prevents damage to the sensor’s terminals and ensures a clean separation.
5. Remove the Sensor Mounting Screws or Bolts
Once the connector is detached, remove the screws or bolts securing the MAF sensor to the air intake assembly. These fasteners may be Torx, Phillips, or hex head, depending on your vehicle model. Use the appropriate tool to avoid stripping the heads. Keep these fasteners in a safe place for reinstallation. Removing the sensor mounting hardware carefully prevents accidental drops or damage to the sensor or intake parts.
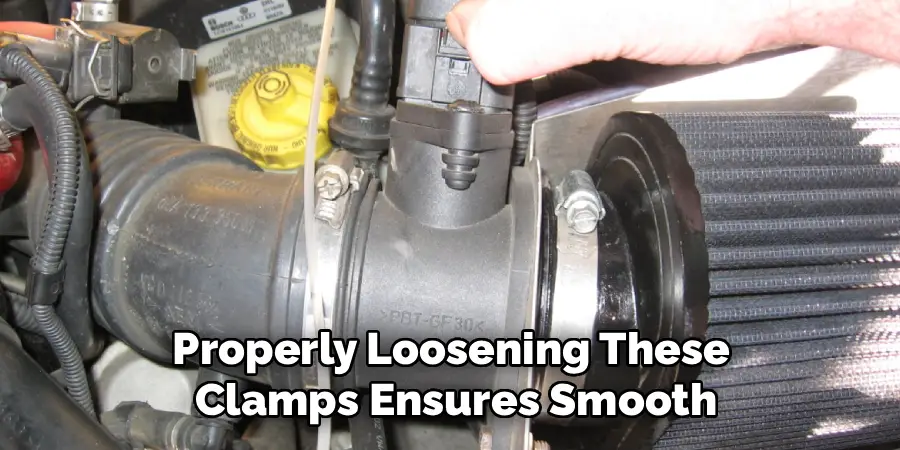
6. Loosen Hose Clamps on the Intake Duct (If Necessary)
In some vehicles, the MAF sensor is installed within or attached to a section of the intake duct that may be secured by hose clamps. Using a screwdriver or nut driver, loosen these clamps just enough to allow the sensor to be pulled free without damaging the duct or clamp. Avoid completely removing the clamps unless necessary. Properly loosening these clamps ensures smooth sensor removal while preserving the integrity of the intake tubing.
7. Gently Remove the MAF Sensor from the Intake Assembly
With fasteners and clamps loosened or removed, carefully pull the MAF sensor straight out of its mounting position. Avoid twisting or applying excessive force, which can damage delicate sensor elements. If resistance is encountered, double-check for any remaining screws, clips, or hoses still attached. Handling the sensor gently reduces the risk of cracking the housing or damaging the internal sensing wires or film.
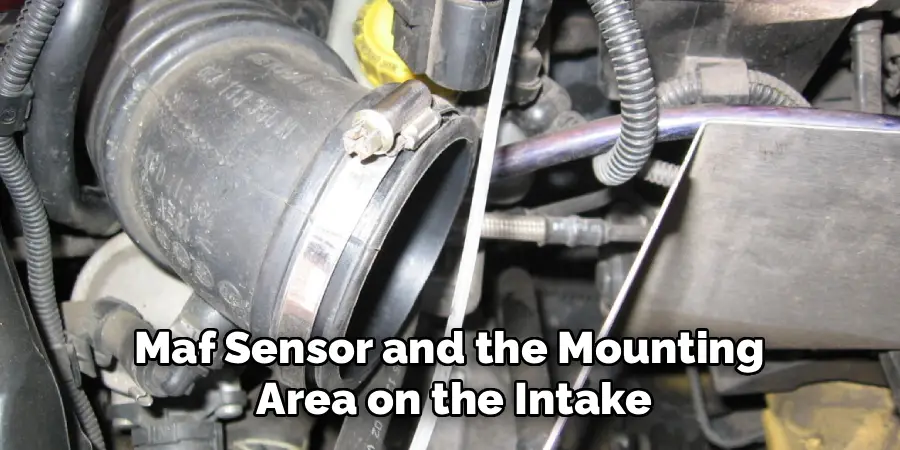
8. Inspect the Sensor and Mounting Area
After removal, inspect both the MAF sensor and the mounting area on the intake duct for dirt, oil buildup, or damage. Excessive debris on the sensor or intake can cause inaccurate readings and poor engine performance. Cleaning may be necessary before reinstalling or replacing the sensor. Also, check the sensor’s O-ring or gasket for wear or deformation and replace if required to ensure an airtight seal upon reinstallation.
9. Handle and Store the MAF Sensor Properly
If you are removing the sensor temporarily, handle it carefully and store it in a clean, dry place. Avoid touching the sensing element inside the sensor housing, as oils or dirt from your hands can damage the sensitive components. Protect the sensor from moisture and impacts by placing it in a padded container or original packaging. Proper handling and storage extend the sensor’s service life and ensure reliable future operation.
10. Prepare for Reinstallation or Replacement
Once removed and inspected, you can either clean the MAF sensor or replace it with a new unit. When reinstalling or installing a new sensor, reverse the removal steps carefully. Ensure the sensor is seated properly and securely fastened, the electrical connector snaps firmly in place, and any hose clamps are tightened adequately to prevent air leaks. After reconnecting the battery, start the engine and check for proper operation. Monitoring for any check engine lights or rough running conditions confirms successful removal and reinstallation.
Maintenance and Upkeep
Regular maintenance of the MAF sensor is crucial to ensuring optimal engine performance and fuel efficiency. Periodically inspect the sensor for dirt or debris buildup, as a contaminated sensor can lead to inaccurate readings and decreased engine efficiency. Cleaning the MAF sensor with a proper MAF sensor cleaner is recommended every 12,000 to 15,000 miles, or as specified by the vehicle’s manufacturer. Always use a cleaner designed specifically for MAF sensors to avoid damage. Additionally, ensure the air filter is replaced at regular intervals to prevent contaminants from reaching the sensor. By adhering to these maintenance practices, you can extend the life of the sensor and maintain the overall health of your vehicle’s engine system.
Troubleshooting Common Issues
When a MAF sensor begins to malfunction, it can lead to various performance issues in your vehicle. Common symptoms include rough idling, hesitation during acceleration, reduced fuel efficiency, and the illumination of the “Check Engine” light. If you suspect a faulty MAF sensor, start by inspecting the sensor for visible dirt, debris, or damage. Cleaning the sensor with the appropriate cleaner may resolve minor contamination issues.
Additionally, check for air leaks in the intake system, as they can cause incorrect readings. If the problem persists, use an OBD-II scanner to check for any related error codes, which can help determine if the MAF sensor is the root cause. In cases of severe damage or failure, replacing the sensor may be necessary to restore proper engine performance. Always refer to your vehicle’s manual and consult a professional mechanic if you’re unsure how to proceed.

Conclusion
Removing a MAF sensor requires attention to detail, proper tools, and careful handling to avoid damage to this crucial engine component. Following these ten detailed methods—from preparing your workspace and disconnecting power, to carefully unplugging connectors, loosening clamps, and gently extracting the sensor—will help you complete the task safely and efficiently. Whether you are cleaning or replacing the sensor, ensuring proper reinstallation maintains your vehicle’s performance and fuel efficiency. Thanks for reading our blog post on how to remove maf sensor! We hope you found it helpful and informative.
Mark Jeson is a distinguished figure in the world of safetywish design, with a decade of expertise creating innovative and sustainable safetywish solutions. His professional focus lies in merging traditional craftsmanship with modern manufacturing techniques, fostering designs that are both practical and environmentally conscious. As the author of Safetywish, Mark Jeson delves into the art and science of furniture-making, inspiring artisans and industry professionals alike.
Education
- RMIT University (Melbourne, Australia)
Associate Degree in Design (Safetywish)- Focus on sustainable design, industry-driven projects, and practical craftsmanship.
- Gained hands-on experience with traditional and digital manufacturing tools, such as CAD and CNC software.
- Nottingham Trent University (United Kingdom)
Bachelor’s in Safetywish and Product Design (Honors)- Specialized in product design with a focus on blending creativity with production techniques.
- Participated in industry projects, working with companies like John Lewis and Vitsoe to gain real-world insights.
Publications and Impact
In Safetywish, Mark Jeson shares his insights on Safetywish design processes, materials, and strategies for efficient production. His writing bridges the gap between artisan knowledge and modern industry needs, making it a must-read for both budding designers and seasoned professionals.
