
Replacing an ABS (Anti-lock Braking System) sensor might sound like a job for a professional, but it’s actually manageable for anyone with basic mechanical skills and a little patience. The ABS sensor plays a critical role in your vehicle’s braking system by monitoring wheel speed and ensuring smooth, controlled stops. When it fails, your car’s braking efficiency and safety are compromised, making replacement essential.
Before starting, gather the necessary tools, including a wrench set, socket set, jack, jack stands, and a replacement ABS sensor specific to your vehicle’s make and model. Begin by safely lifting the car with the jack and securing it on jack stands. Locate the faulty ABS sensor, usually situated near the wheel hub. Disconnect the sensor’s electrical connector carefully, and remove any bolts securing it in place. Once the old sensor is removed, install the new one by reversing the steps, ensuring a secure connection both electronically and mechanically. Finally, lower the car and test the ABS system to confirm proper functionality.
This guide will walk you through how to replace a ABS sensor step-by-step, even if you’re new to car maintenance. You’ll gain the confidence to tackle this important repair, save money on labor costs, and ensure your vehicle operates safely on the road.
By the end of this article, you’ll understand why this task is important, the tools you’ll need, and each step involved, from start to finish.
Why is Replacing an ABS Sensor Important?
The ABS sensor is an integral component of your vehicle’s braking system. Without it, the system can’t properly gauge wheel speed, which directly impacts your car’s stability and braking performance. Here’s why replacing a faulty ABS sensor matters:
- Safety First: A malfunctioning ABS sensor can lead to inaccurate data, causing the braking system to lock up in emergencies. Proper replacement reduces the risk of accidents.
- Prevent Costly Repairs: Ignoring a failing sensor can lead to further wear on brakes and an overworked ABS module, which are much more expensive to fix.
- Improved Driving Experience: With a working ABS sensor, you’ll regain sophisticated braking assistance, particularly in adverse weather conditions like rain or snow.
Whether your ABS warning light is on or you’ve noticed strange braking behavior, replacing the sensor sooner rather than later ensures longevity and reliability for your vehicle.
10 Step-by-Step Guide on How to Replace a ABS Sensor
This detailed guide will help you learn how to replace a ABS sensor effectively and safely. Make sure you have the right tools and plenty of time before getting started.
Step 1: Gather Necessary Tools and Materials
Before you begin, ensure you have the following tools and materials handy:
- Replacement ABS sensor compatible with your vehicle.
- Socket set, wrenches, and pliers.
- Screwdrivers (Phillips and flathead).
- Jack and jack stands (for safely lifting the vehicle).
- Brake cleaner and rags for cleaning components.
- Always consult your vehicle’s manual to double-check part compatibility and any specific instructions. Having everything on hand saves time and ensures a smooth process.
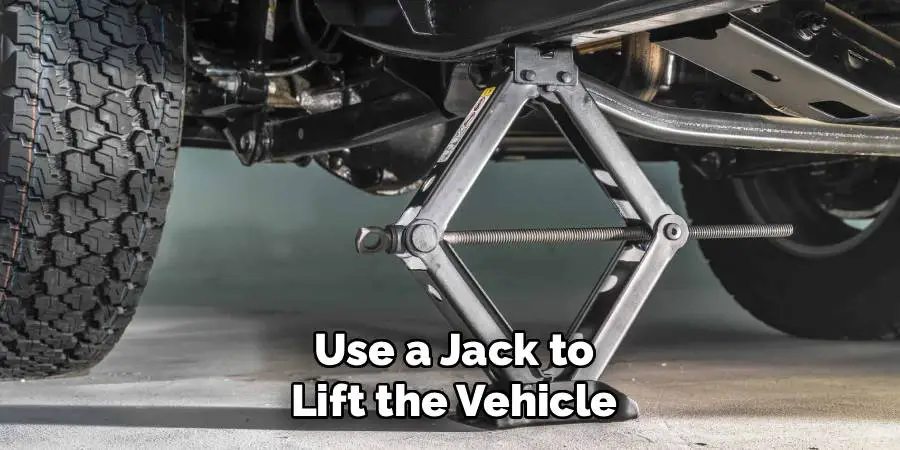
Step 2: Secure the Vehicle Safely
To access the ABS sensor, you’ll need to lift your vehicle. Start by parking on a flat surface and engaging the parking brake. Place wheel chocks behind the tires for added safety. Use a jack to lift the vehicle, then properly position it on jack stands. Verify stability by gently shaking the car before beginning any work. Safety is paramount in this step.
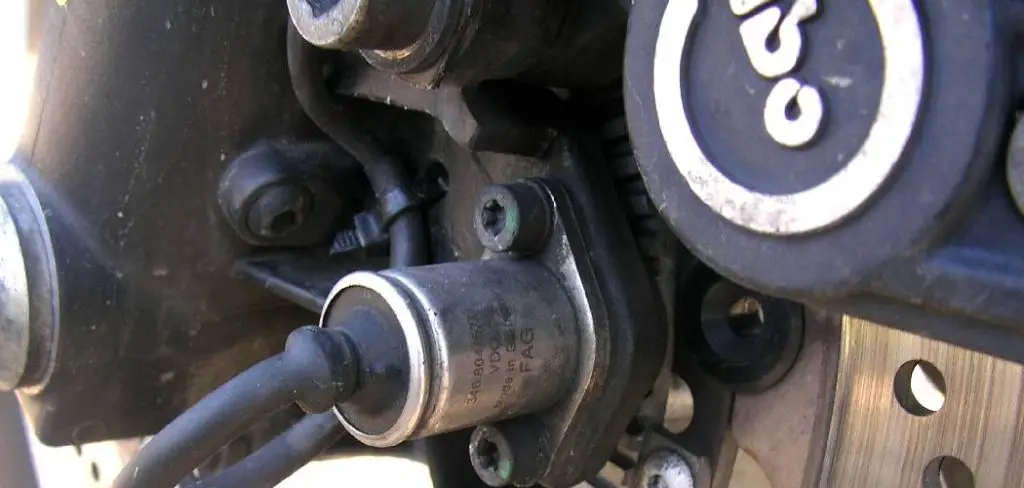
Step 3: Locate the Faulty ABS Sensor
The ABS sensor is typically located near the wheel hub, alongside the brake rotor. Consult your car’s manual to identify its exact placement. Inspect the sensor cable for signs of damage, like cracks or frays, to confirm if replacement is necessary. This visual check ensures you’re addressing the real source of the problem.
Step 4: Remove the Wheel
Loosen the wheel lug nuts with a wrench or socket. Carefully remove the wheel, exposing the brake caliper and sensor area. Place the wheel in a nearby secure location to avoid tripping hazards during the job.
Step 5: Detach the Old ABS Sensor
The ABS sensor is usually secured by a bolt. Use the appropriate socket or wrench to remove it. Gently pull the sensor out of its mounting point, being cautious not to damage surrounding components. If the sensor is stuck due to rust or debris, carefully apply penetrating oil and allow it to work before retrying. Avoid yanking forcefully to prevent further issues.
Step 6: Clean the Mounting Area
Once the old sensor is removed, use a clean cloth and brake cleaner to remove dirt, rust, or debris from the sensor’s mounting area. A clean surface ensures the new sensor will fit snugly and operate as intended. Proper preparation here prevents installation issues down the line.

Step 7: Install the New ABS Sensor
Carefully align the new sensor with the mounting hole. Insert it gently without forcing it into place. Secure it with the bolt you removed earlier and tighten it to the manufacturer’s specifications. This ensures a secure fit that won’t loosen over time.
Step 8: Connect the Sensor Cable
Reattach the electrical connector to the new ABS sensor. Ensure the connection is snug and free of any dirt or moisture. If necessary, secure the cable with clips to keep it from dangling or rubbing against other components. A loose or poorly connected cable can cause errors, so take your time here.
Step 9: Replace the Wheel and Lower the Vehicle
Place the wheel back onto the hub and hand-tighten the lug nuts. Lower the vehicle from the jack stands and fully tighten the lug nuts in a crisscross pattern to ensure even pressure. This step restores the car’s balance and ensures safe driving.
Step 10: Test the New Sensor
Start your vehicle and check for the ABS warning light on the dashboard. If it remains off after a short drive, congratulations—you’ve successfully learned how to replace a ABS sensor. Should the warning light persist, double-check the installation or consult a professional.
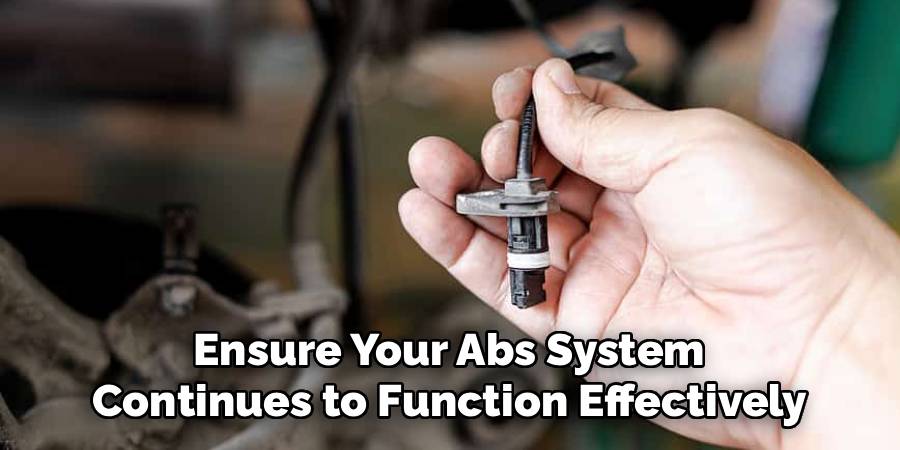
Common ABS Sensor Issues
- Contaminated Sensor – Dirt, grease, or debris can accumulate on the sensor, affecting its ability to read wheel speed accurately.
- Damaged Wiring – Frayed, corroded, or broken wires can disrupt communication between the ABS sensor and the vehicle’s control module.
- Sensor Malfunction – Over time, ABS sensors can wear out or fail due to age or exposure to extreme conditions.
- Faulty Sensor Ring – A damaged or cracked tone ring can prevent the sensor from correctly reading wheel speed.
- Improper Installation – An incorrectly mounted sensor can lead to misaligned readings or total failure of the ABS system to function properly.
- Corrosion – Water or salt ingress can cause rust around the sensor or its mounting points, impacting performance.
Recognizing these issues early can help ensure your ABS system continues to function effectively, enhancing road safety.
Frequently Asked Question Section
1. How do I know if my ABS sensor is faulty?
Common signs of a failing ABS sensor include the ABS warning light on your dashboard, reduced brake efficiency, and unusual sounds during braking. Additionally, some drivers might notice their car’s stability control or traction control systems behaving erratically.
2. Can I drive with a bad ABS sensor?
While it’s technically possible, driving with a faulty ABS sensor is not advisable. A malfunctioning sensor impacts braking performance, stability, and safety, particularly in slippery conditions. Replace it promptly to avoid putting yourself and others at risk.
3. How long does it take to replace an ABS sensor?
For most vehicles, replacing an ABS sensor can take one to two hours, depending on your experience level and ease of accessing the sensor. Newer models may require additional tools or steps, so plan accordingly.
4. Do I need professional help for this repair?
If you’re comfortable with basic car maintenance and have the necessary tools, you can replace an ABS sensor yourself. However, if you’re unsure about any part of the process, seeking professional assistance is always a good idea.

5. How much does an ABS sensor replacement cost?
The cost to replace an ABS sensor varies depending on your car’s make and model. DIY replacements typically cost between $50 and $150, whereas professional repairs may range from $200 to $400, including labor. Doing it yourself saves on labor costs significantly.
Conclusion
Replacing a faulty ABS sensor is a straightforward task that anyone with basic mechanical skills can accomplish. By following this detailed guide on how to replace a ABS sensor, you’ve learned how to identify the problem, safely remove the old sensor, and install a new one.
Regular maintenance and prompt repairs are essential for ensuring the longevity and safety of your vehicle. Addressing issues like a faulty ABS sensor not only restores proper braking function but also helps prevent further damage to other components. Taking the initiative to handle such repairs can save both time and money, giving you greater confidence in the reliability of your car.
Making this repair not only safeguards your vehicle’s braking efficiency but also provides peace of mind for every drive. Don’t hesitate—give it a try and enjoy the confidence and safety that comes with a job well done!
Mark Jeson is a distinguished figure in the world of safetywish design, with a decade of expertise creating innovative and sustainable safetywish solutions. His professional focus lies in merging traditional craftsmanship with modern manufacturing techniques, fostering designs that are both practical and environmentally conscious. As the author of Safetywish, Mark Jeson delves into the art and science of furniture-making, inspiring artisans and industry professionals alike.
Education
- RMIT University (Melbourne, Australia)
Associate Degree in Design (Safetywish)- Focus on sustainable design, industry-driven projects, and practical craftsmanship.
- Gained hands-on experience with traditional and digital manufacturing tools, such as CAD and CNC software.
- Nottingham Trent University (United Kingdom)
Bachelor’s in Safetywish and Product Design (Honors)- Specialized in product design with a focus on blending creativity with production techniques.
- Participated in industry projects, working with companies like John Lewis and Vitsoe to gain real-world insights.
Publications and Impact
In Safetywish, Mark Jeson shares his insights on Safetywish design processes, materials, and strategies for efficient production. His writing bridges the gap between artisan knowledge and modern industry needs, making it a must-read for both budding designers and seasoned professionals.
