
Understanding how to remove crankshaft position sensor is essential for anyone troubleshooting automotive issues. The crankshaft position sensor plays a vital role in monitoring the position and rotational speed of the crankshaft, transmitting this key data to the engine control unit (ECU). This information helps the engine optimize fuel injection and ignition timing, ensuring smooth performance and efficiency.
Before starting the removal process, it is important to ensure safety by disconnecting the vehicle’s battery to prevent any electrical issues. Locate the crankshaft position sensor, which is typically found near the engine’s crankshaft or on the transmission bell housing, depending on the vehicle make and model. Refer to the vehicle’s service manual for its exact location. Once located, you will need to carefully disconnect the electrical connector attached to the sensor, using a screwdriver or appropriate tool if necessary to release the clip. Be cautious not to damage the surrounding wires or components during this step.
If this sensor malfunctions, symptoms like engine misfires, stalling, or trouble starting may arise. Replacing it promptly can prevent further complications and maintain your vehicle’s reliability. The good news? Removing a faulty crankshaft position sensor isn’t as tricky as it sounds with the right tools, patience, and guidance. This step-by-step guide will show you how to safely and confidently handle the replacement, even if you’re a beginner in vehicle maintenance.
Why Removing a Crankshaft Position Sensor Is Important
A crankshaft position sensor failure can severely affect your engine’s performance and even lead to breakdowns if ignored. Since the sensor directly impacts crucial aspects of the engine’s operations, such as spark timing and fuel delivery, a malfunction can throw off the entire system.
Modern vehicle diagnostics often detect and signal issues related to this sensor via the check engine light. Ignoring these warnings can result in prolonged wear and damage to other components of the engine. Additionally, addressing the sensor issue promptly can improve fuel efficiency, restoring overall performance and ensuring your car operates reliably.
Understanding how to remove and replace a crankshaft position sensor can save you from costly repairs, as it allows you to resolve one of the most common causes of engine problems efficiently. Being proactive about replacing this part keeps your vehicle running smoothly and extends the engine’s lifespan.
9 Step-by-Step Guide: How to Remove Crankshaft Position Sensor
Step 1: Locate the Sensor
The first step to removing a crankshaft position sensor is finding its location in your vehicle. Generally, the sensor can be situated near the engine block, crankshaft pulley, or timing cover, though its exact placement varies depending on the make and model of your car.

Consult your vehicle’s owner manual for guidance, as this will indicate the precise location of the sensor. You may also want to reference any engine diagrams specific to your car to avoid confusion. Once you locate the sensor, identify any surrounding components, like hoses or harnesses, that you might need to move to access it. Familiarizing yourself with its position will ensure a smoother and more efficient removal process.
Step 2: Disconnect the Vehicle Battery
Safety is paramount before handling any electrical components. Begin by disconnecting the negative terminal of your vehicle’s battery to prevent potential electrical shocks or short circuits. Use an appropriately sized wrench to loosen the terminal and carefully set it aside to avoid accidental reconnection during the process.
By isolating the power source, you safeguard both yourself and delicate electronic systems in the car, such as the ECU. This step also helps reset certain warning lights, like the check engine light, after the repair is complete. Disconnecting the battery ensures that all further work can be carried out safely.
Step 3: Access the Sensor Area
Now that you’ve identified the crankshaft position sensor’s location, prepare the area for removal. Depending on its placement, you might need to move surrounding parts like protective covers, engine brackets, or hoses. Take note of the layout as you work, so you’ll know how to position everything back correctly later.
Using basic hand tools like a ratchet and socket can help you remove obstructive parts easily. For tight spaces, a flexible extension or slim ratchet could be required. Cleaning the area around the sensor using a clean cloth helps remove dirt and grime, allowing for unhindered removal. Proper preparation ensures a hassle-free process.
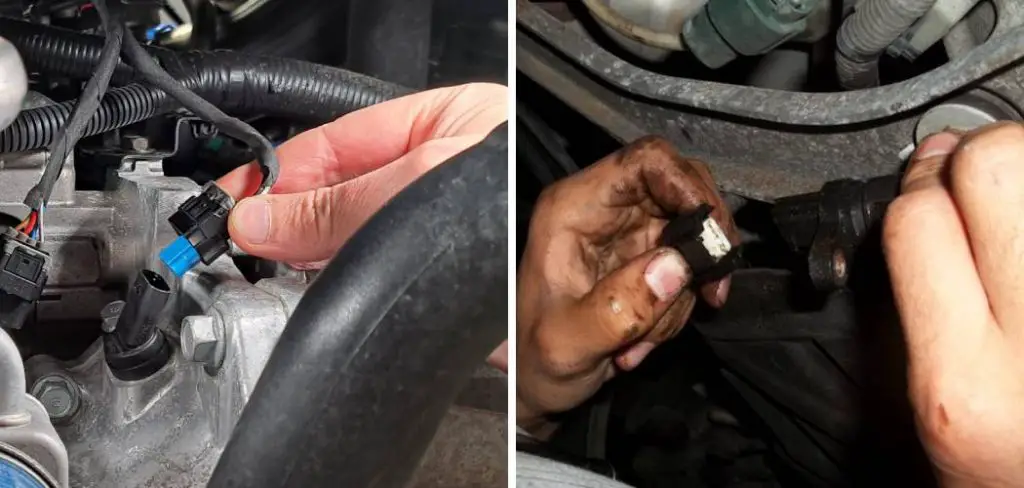
Step 4: Disconnect the Sensor Wiring Harness
The crankshaft position sensor connects to the vehicle’s electrical system via a wiring harness. Gently disconnect the harness by locating the plug and pressing or sliding its release tab. If the connector appears stuck or corroded, apply a small amount of penetrating oil and allow it to rest for a few minutes before attempting removal.
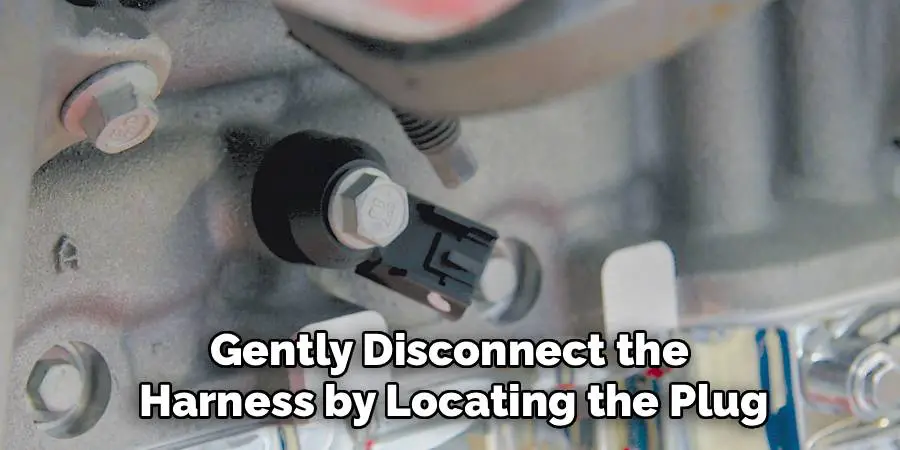
Be careful not to force the connector, as this can damage the clips or underlying wiring. Taking your time to disconnect the harness cleanly prevents potential connectivity issues when the replacement sensor is installed. With this step complete, you’re ready to move on to the actual sensor removal.
Step 5: Remove the Sensor
Now it’s time to remove the crankshaft position sensor itself. Locate and loosen the bolts or screws securing the sensor in place using the appropriate socket or wrench size. Once all fasteners are removed, carefully pull the sensor out of its housing. It might require gentle wiggling to release it, especially if debris or grime is present.
If the sensor is especially stuck, a flathead screwdriver can help provide the leverage needed to unseat it. Be cautious not to damage surrounding components during extraction. Once the sensor is free, compare it to the replacement part to ensure compatibility before proceeding further.
Step 6: Inspect and Clean the Mounting Area
Before installing the replacement sensor, inspect the mounting area for any dirt, corrosion, or damage. Wipe the housing with a clean cloth and remove any debris that might interfere with the new sensor’s installation. Using a flashlight can help identify potential obstructions inside the sensor cavity.

This cleaning step is vital for ensuring the new sensor fits snugly and functions efficiently. Address any visible damage to surrounding parts to prevent issues post-installation. A thorough inspection protects the integrity of the new crankshaft position sensor.
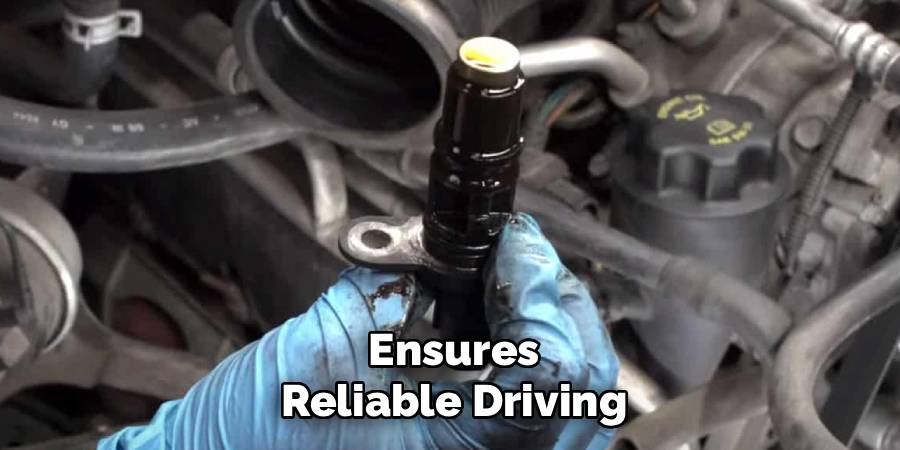
Step 7: Fit and Secure the New Sensor
Carefully insert the replacement crankshaft position sensor into its mounting location. Ensure that it aligns correctly and fits snugly within the housing. Once the sensor is in place, reinstall the bolts or screws and tighten them securely using the appropriate tools. Avoid overtightening, as this can damage the sensor or its housing.
With the sensor secured, reconnect the wiring harness, pressing firmly until the plug clicks into place. Double-check all connections and fittings before proceeding to the next steps. Proper installation prepares the sensor for reliable operation.
Step 8: Reassemble Removed Components
Once the sensor is replaced, reattach any components you moved during the process. This might include engine covers, brackets, or hoses that were disconnected earlier. Secure everything firmly and in the correct orientation as per the original setup.
Reassembly ensures that your engine bay returns to its fully functional state, with no loose parts that might cause issues during operation. Taking extra time to verify proper placement minimizes the risk of errors. This step brings you closer to completing the crankshaft position sensor replacement.
Step 9: Test the Repair
Reconnect the vehicle’s battery and start the engine to test the success of your work. Observe how the engine runs, paying attention to symptoms like hesitation, stalling, or check engine lights. Use an OBD2 scanner to clear any lingering fault codes and confirm that the sensor is communicating properly with the ECU.

Testing ensures that everything is functioning as expected and gives you the confidence to proceed with regular vehicle use. If issues persist, revisit previous steps or consult a professional mechanic for further guidance. Successful testing confirms the effectiveness of your crankshaft position sensor replacement.
Benefits of Diy Repairs
Performing DIY repairs on your vehicle offers numerous benefits that can save time, money, and provide a sense of accomplishment. One of the primary advantages is cost savings, as tackling repairs on your own eliminates the need for labor charges from professional mechanics. Additionally, DIY repairs allow you to learn more about your vehicle, enhancing your understanding of its components and functionality. This knowledge can empower you to handle minor issues promptly, reducing downtime.
Furthermore, there is satisfaction in successfully resolving problems yourself, which builds confidence in your abilities. Lastly, repairing your vehicle at home gives you greater control over the quality of parts and tools used, ensuring that the work meets your standards. DIY repairs not only provide practical advantages but also foster a rewarding sense of independence.
Frequently Asked Question
What are the symptoms of a faulty crankshaft position sensor?
Common symptoms include engine misfires, difficulty starting, decreased fuel efficiency, and stalling during operation. These issues occur because the ECU is unable to receive accurate data on the crankshaft’s position and speed from the sensor.
Can I replace a crankshaft position sensor myself?
Yes, replacing a crankshaft position sensor is a manageable DIY task with the right tools and guidance. Ensure you follow proper safety procedures, such as disconnecting the battery, to prevent damage or injury during the process.
How do I know if my crankshaft position sensor is bad?
A diagnostic tool like an OBD2 scanner can detect error codes related to the sensor. Additionally, physical symptoms like engine hesitation or a persistent check engine light often indicate a malfunction.
Is it safe to drive with a faulty crankshaft position sensor?
Driving with a faulty sensor can lead to poor engine performance and potential stalling, making it unsafe. Prompt replacement prevents further complications and ensures reliable driving.
Do I need special tools to replace a crankshaft position sensor?
Basic hand tools like a socket wrench, ratchet, and screwdrivers are usually sufficient. For specific vehicle models, additional tools like a flexible extension may be helpful.
Conclusion
Knowing how to remove crankshaft position sensor is a useful skill that can save time and money while maintaining your vehicle’s performance. By following a methodical approach—locating, safely disconnecting, and replacing the sensor—you can resolve engine-related issues effectively.
Regular maintenance and attentiveness to your vehicle’s components can prevent many issues before they arise. Ensuring that sensors, like the crankshaft position sensor, are checked periodically can help maintain engine efficiency and reduce the likelihood of unexpected breakdowns. Taking proactive steps not only extends the life of your vehicle but also ensures a smoother and safer driving experience.
Take the initiative to handle small vehicle repairs yourself, and enjoy the satisfaction of keeping your car running smoothly. With these steps, you’re well-equipped to confidently replace a crankshaft position sensor and restore optimal engine performance!
Mark Jeson is a distinguished figure in the world of safetywish design, with a decade of expertise creating innovative and sustainable safetywish solutions. His professional focus lies in merging traditional craftsmanship with modern manufacturing techniques, fostering designs that are both practical and environmentally conscious. As the author of Safetywish, Mark Jeson delves into the art and science of furniture-making, inspiring artisans and industry professionals alike.
Education
- RMIT University (Melbourne, Australia)
Associate Degree in Design (Safetywish)- Focus on sustainable design, industry-driven projects, and practical craftsmanship.
- Gained hands-on experience with traditional and digital manufacturing tools, such as CAD and CNC software.
- Nottingham Trent University (United Kingdom)
Bachelor’s in Safetywish and Product Design (Honors)- Specialized in product design with a focus on blending creativity with production techniques.
- Participated in industry projects, working with companies like John Lewis and Vitsoe to gain real-world insights.
Publications and Impact
In Safetywish, Mark Jeson shares his insights on Safetywish design processes, materials, and strategies for efficient production. His writing bridges the gap between artisan knowledge and modern industry needs, making it a must-read for both budding designers and seasoned professionals.
