
Removing an Xfinity window sensor can seem challenging, but with the right approach, it’s a straightforward process. Whether you’re upgrading your system, relocating the sensor, or troubleshooting an issue, understanding the steps involved will help you complete the task safely and effectively. This guide will walk you through the process of how to remove xfinity window sensor.

What Is an Xfinity Window Sensor?
An Xfinity window sensor is a small, wireless device designed to enhance home security by monitoring the status of windows. It works as part of the Xfinity Home security system and alerts users if a window is opened or tampered with. These sensors typically consist of two components: a sensor unit and a magnet, which are aligned when the window is closed. When the window is opened and this alignment is disrupted, the sensor detects the change and sends a signal to the system, triggering an alert. Xfinity window sensors are easy to install and play a crucial role in protecting your home by keeping you informed of any potential security breaches.
Why You Might Need to Remove an Xfinity Window Sensor
There are several reasons why you might need to remove an Xfinity window sensor. One common reason is upgrading your home security system, which may involve replacing older sensors with newer, more advanced models. Another reason could be relocating the sensor to a different window or adjusting its placement for optimal performance. Additionally, you might need to remove a sensor if it is malfunctioning or has been damaged and requires repair or replacement. Other homeowners might be moving to a new residence and want to take their security equipment with them. Whatever the reason, it’s important to follow the proper steps to ensure the removal process is done safely and effectively.
Tools and Materials Needed
To safely and effectively remove a sensor, you will need a few basic tools and materials. These include:
- Screwdriver (Phillips or flathead, depending on the type of screws used).
- Adhesive remover (if the sensor is attached using double-sided tape or similar adhesives).
- Replacement adhesive (if you plan to reinstall the sensor elsewhere).
- Cleaning cloth or rag (to clean the surface after removal).
- Ladder or step stool (if the sensor is installed in a hard-to-reach area).
- Protective gloves (optional, for safety or to prevent fingerprints on surfaces).
Having these items on hand will help ensure a smooth and efficient removal process, minimizing the risk of damage to the sensor or surrounding areas.
10 Methods How to Remove Xfinity Window Sensor
1. Disarm or Bypass the Sensor in the Xfinity Security System
The first and most important step before physically removing the sensor is to disarm your entire security system or bypass the specific window sensor within the Xfinity app or control panel. If the sensor remains active during removal, tampering could trigger false alarms and generate unwanted notifications. Disarming the sensor ensures a smooth removal process without triggering the alarm, which could cause inconvenience or panic. To disarm, open your Xfinity app, navigate to the security device list, select the sensor to be removed, and follow the instructions to bypass or disable it temporarily. This proactive measure preserves both your peace of mind and the system’s accuracy.

2. Remove the Sensor’s Battery to Power Down the Device
Most Xfinity window sensors are battery-operated, typically using small lithium coin cells. To prevent accidental signaling or power-related damage during removal, it is advisable to open the sensor’s battery compartment and remove the battery. This will power down the device completely. Carefully open the battery cover using your fingernail or a small screwdriver, avoiding force that could crack the casing. Remove the battery gently, noting its orientation for proper replacement or disposal. Powering down the sensor safeguards it from electrical surges or damage during handling.
3. Remove the Sensor from Your Xfinity Account
Before detaching the sensor from the window physically, remove or unregister it from your Xfinity security account. Leaving a removed sensor registered can lead to system errors or communication faults, as the control panel continues to expect signals from a device that no longer exists on-site. Using the Xfinity app or web portal, access your device management section, select the sensor, and choose the option to delete or disable the sensor from your account. This administrative step is crucial for maintaining a clean and functional security device list.
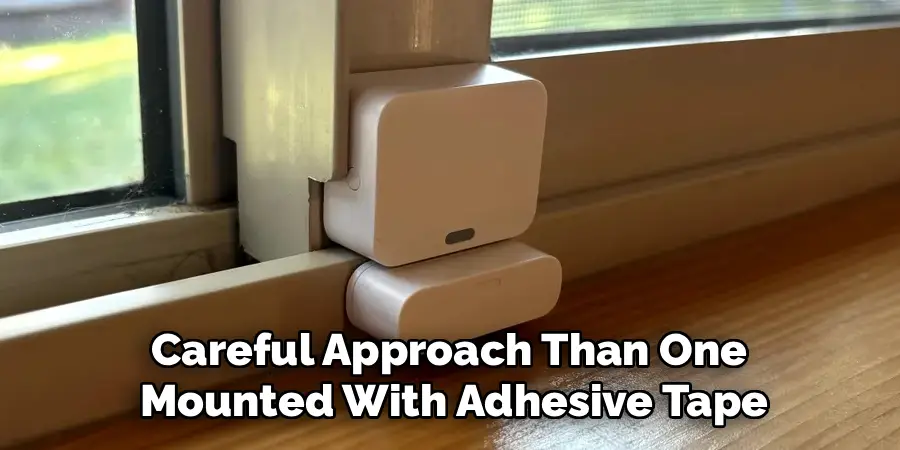
4. Inspect the Mounting Method — Adhesive Tape or Screws
Xfinity window sensors are predominantly installed using strong double-sided adhesive tape to minimize damage and facilitate easy installation. However, in some instances or older setups, screws or mounting brackets might have been used. Carefully inspect the sensor’s edges and backside to determine how it is affixed. Identifying the mounting method helps you plan the correct removal technique. Removing a sensor attached with screws requires different tools and a more careful approach than one mounted with adhesive tape.
5. Soften the Adhesive Using Gentle Heat to Facilitate Removal
If the sensor is attached via adhesive and has been in place for a long time, the glue might have hardened, making removal more difficult and increasing the risk of damage to the paint or window frame. Applying gentle heat using a hairdryer on a low to medium setting can soften the adhesive, making it more pliable. Hold the hairdryer approximately 6 to 8 inches away from the sensor’s edges and warm the area evenly for about 30 to 60 seconds. Be cautious not to overheat, as excessive heat can damage the sensor’s internal electronics or deform plastic components. This warming process helps reduce the adhesive’s grip, enabling smoother detachment.
6. Use a Plastic Pry Tool to Carefully Separate the Sensor
After softening the adhesive, use a plastic pry tool, an old credit card, or a guitar pick to gently work around the edges of the sensor. Avoid metal tools, which can scratch or gouge the window frame or sensor casing. Insert the tool slowly between the sensor and the mounting surface and gently twist or wiggle it to break the adhesive bond. Work your way gradually along the edges, applying steady, gentle pressure to prevent cracking the sensor housing or peeling paint. Patience in this step ensures the sensor and surface remain intact and ready for reuse or repainting.
7. Remove Any Residual Adhesive from the Window Frame or Wall
After detaching the sensor, you will likely find some adhesive residue left behind on the mounting surface. To clean this without harming the window frame or wall, use a soft cloth dampened with rubbing alcohol, adhesive remover, or mild soapy water. Test your chosen cleaning agent on a small, inconspicuous area first to ensure it does not cause discoloration or damage. Gently rub the residue in a circular motion until it loosens and wipes away. Removing this residue is important to maintain a clean, smooth surface for future sensor installation or general aesthetics.

8. Inspect the Sensor for Any Physical Damage
Once the sensor is removed, carefully inspect it for physical damage such as cracks, broken clips, or corrosion in the battery compartment. Damage to the casing or electronic components can impair the sensor’s functionality or longevity. If you intend to reuse the sensor, ensure it is thoroughly cleaned and dry before storage or reinstallation. If you notice any faults or damage, contact Xfinity customer support for repair options or consider replacing the sensor entirely to maintain optimal system performance.
9. Store the Sensor Properly if You Plan to Reuse It
If the sensor is to be reused, proper storage is important to preserve its condition. Remove the battery to prevent leakage and store the device in a dry, cool environment away from direct sunlight, dust, or moisture. Avoid storing it in areas with extreme temperatures, as this can degrade electronic components. When ready for reinstallation, use fresh adhesive strips designed for Xfinity sensors to guarantee a secure mount and reliable operation.
10. Update Your Security System and Test After Removal
After the sensor is removed, keep an eye on your Xfinity security system for any alerts or error messages related to the missing sensor. If you replaced the sensor with a new device, immediately follow the manufacturer’s pairing instructions via the Xfinity app to add the new sensor to your system. Testing the sensor by opening and closing the corresponding window ensures it communicates correctly with the security hub. Maintaining updated and accurate device listings guarantees your security system’s effectiveness and your home’s safety.

Conclusion
Removing Xfinity window sensors properly involves a combination of careful preparation, gentle handling, and system management to avoid damage and maintain security integrity. By disarming the sensor, softening adhesives, using appropriate tools for removal, and cleaning residual materials, you can detach the sensors safely without harming your windows or the device. Additionally, removing the sensor from your Xfinity account and monitoring the system post-removal ensures seamless operation. Following these ten elaborated methods guarantees an efficient, damage-free removal process that preserves both your home and your security system’s reliability. Thanks for reading our blog post on how to remove xfinity window sensor! We hope you found it helpful and informative.
Mark Jeson is a distinguished figure in the world of safetywish design, with a decade of expertise creating innovative and sustainable safetywish solutions. His professional focus lies in merging traditional craftsmanship with modern manufacturing techniques, fostering designs that are both practical and environmentally conscious. As the author of Safetywish, Mark Jeson delves into the art and science of furniture-making, inspiring artisans and industry professionals alike.
Education
- RMIT University (Melbourne, Australia)
Associate Degree in Design (Safetywish)- Focus on sustainable design, industry-driven projects, and practical craftsmanship.
- Gained hands-on experience with traditional and digital manufacturing tools, such as CAD and CNC software.
- Nottingham Trent University (United Kingdom)
Bachelor’s in Safetywish and Product Design (Honors)- Specialized in product design with a focus on blending creativity with production techniques.
- Participated in industry projects, working with companies like John Lewis and Vitsoe to gain real-world insights.
Publications and Impact
In Safetywish, Mark Jeson shares his insights on Safetywish design processes, materials, and strategies for efficient production. His writing bridges the gap between artisan knowledge and modern industry needs, making it a must-read for both budding designers and seasoned professionals.
