
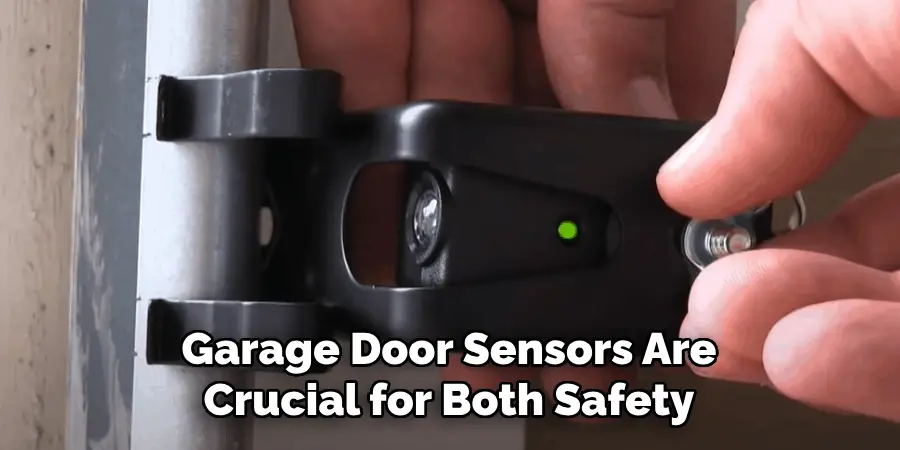
Replacing a garage door sensor may seem daunting at first, but with the right tools and a little guidance, it can be a manageable DIY task. Garage door sensors are crucial for both safety and functionality, as they prevent the door from closing if an obstruction is detected. Over time, sensors may become misaligned or damaged, necessitating replacement.
This guide will walk you through the step by step process of how to replace garage sensor, ensuring your garage door operates smoothly and safely once again. With attention to detail and patience, you’ll have your new sensor installed and functioning in no time.
What Are Garage Door Sensors
Garage door sensors are integral components of modern garage door systems designed to enhance safety and efficiency. These sensors typically use infrared beams to detect obstructions in the door’s path. When an object interrupts the beam, the sensor sends a signal to halt or reverse the door’s movement, preventing potential damage or injury. Usually positioned near the bottom of the garage door tracks, these devices form a crucial safety feature, especially in households with pets or children.
In addition to safety, they contribute to the smooth operation of garage doors by minimizing the risk of mechanical malfunctions related to unexpected obstructions.
The Role of Sensors in Garage Doors
Garage door sensors play a vital role in ensuring the safety and efficiency of your garage door system. These devices are primarily responsible for detecting any obstructions in the doorway—whether a car, an object, or even a person—and preventing the door from closing to avoid accidents or damage. The sensors typically work in pairs, emitting an invisible beam across the garage opening.
If this beam is interrupted, the sensors signal the garage door opener to halt the closing action, reverse, and reopen the door. This mechanism not only protects individuals and belongings from harm but also prolongs the lifespan of the garage door by reducing unnecessary stress and wear. Investing in a reliable sensor system is an essential aspect of home safety and maintenance.
Importance of Proper Sensor Replacement
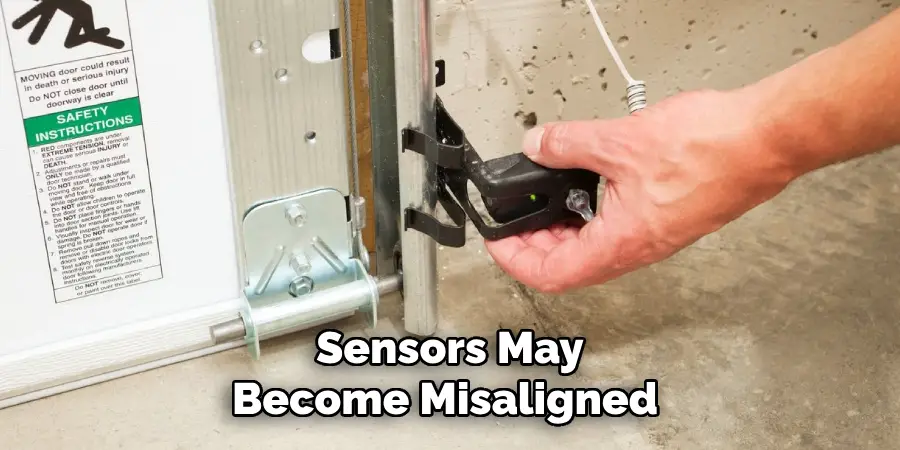
Proper sensor replacement is crucial for maintaining the safety and functionality of your garage door system. Faulty or misaligned sensors can lead to unnecessary hazards, such as the garage door closing inadvertently and potentially causing injury or damage. Moreover, a malfunctioning sensor system might result in the door failing to operate altogether, leading to inconveniences and potential security risks for your home. Ensuring that sensors are correctly installed and aligned maximizes their effectiveness, allowing them to accurately detect obstructions and respond appropriately.
By replacing sensors correctly, you not only safeguard your family and possessions but also extend the longevity of your garage door opener system. Regular checks and maintenance of these sensors are therefore vital to prevent malfunctions and ensure peace of mind.
10 Easy Ways For How to Replace Garage Sensor
Got a garage door sensor that’s acting up again? We’ve all been there. Whether it’s refusing to cooperate with your remote or simply giving you the silent treatment, a faulty garage sensor can turn even the simplest task into a frustrating ordeal. But before you call Uncle Bob or fork out for a pricey professional, why not try fixing it yourself? Grab your toolbox and a can-do attitude—we’re about to make you the hero of your own garage.
1. Identify the Problem Before You Start
Before you launch into DIY mode, it’s crucial to know exactly what you’re dealing with. Is the sensor not responding at all? Is it misaligned? Or is it just plain dead? Start by giving your sensor a visual once-over—look for frayed wires, obstructed lenses, or any obvious damage. Sometimes, all it takes is a little cleaning or repositioning. Don’t forget, even the tiniest cobweb can send your sensor into a tizzy!
2. Gather Your Tools and Supplies
You’re going to need a few essentials to tackle this project. Make sure you have a screwdriver, pliers, a level, some cleaning cloths, and a replacement sensor kit handy. Some sensors are plug-and-play, while others might require you to get your hands a bit dirty with wiring. Oh, and don’t forget a ladder if your garage is vertically generous. Safety first, folks!
3. Disconnect the Power
Okay, let’s avoid turning this into a shocking experience—literally. Always disconnect the power to your garage door opener before you start fiddling with the sensors. You can usually find a power cord near the garage ceiling or simply flip the switch at your main electrical panel. Remember, working with live electricity is a no-no unless you’re a trained professional or have a superhero cape on.
4. Remove the Old Sensor
Time to bid farewell to the problematic sensor. Use your trusty screwdriver to remove the screws holding the sensor in place. Gently detach the wires connected to the sensor, making sure to remember which wire goes where. This isn’t a game of musical chairs—you’ll need to reconnect them correctly later. If you’re the forgetful type, snapping a quick photo with your phone can be a lifesaver.
5. Install the New Sensor
Here’s where the fun begins! Grab your shiny new sensor and attach the wires using the same configuration as the old one. Remember that photo you took? Now’s the time to refer to it. Mount the sensor in its designated spot and secure it with screws. Use the level to ensure it’s perfectly aligned. Misaligned sensors are like bickering siblings—they just can’t get along!

6. Align the Sensors
Speaking of alignment, let’s make sure your sensors are getting along like best buds. Most garage door sensors have an indicator light that tells you when they’re properly aligned. Adjust the sensors until the light is steady and not flickering like a disco party. This will ensure smooth communication between the sensors, preventing unnecessary stops and starts.
7. Test the Sensor
With your sensors installed and aligned, it’s time for the moment of truth. Reconnect the power and test the garage door opener to see if the sensors are working their magic. Stand back and press that remote button with newfound confidence. If the door goes up and down without a hitch, congrats! You’ve just nailed it. If not, it’s time to revisit the steps and troubleshoot.
8. Troubleshoot Any Issues
If your sensor is still giving you grief, don’t throw in the towel just yet. Double-check your wiring connections, alignment, and sensor sensitivity settings. Sometimes, it’s the simplest things that trip us up. If you’re still stuck, consult the user manual that came with your sensor or hit up the manufacturer’s website for troubleshooting tips. No shame in asking for a little digital help!
9. Consider Upgrading Your System
If you’re finding yourself constantly dealing with sensor issues, it might be time to consider upgrading your entire garage door opener system. Modern systems often come with advanced features like smartphone control and enhanced safety mechanisms. Plus, a fresh start can save you from future headaches and keep your garage door purring like a kitten.
10. Celebrate Your DIY Success
Congratulations, you’ve successfully replaced your garage door sensor and saved yourself a heap of money in the process! Take a moment to admire your handiwork and bask in the glory of a job well done. Now, whenever you walk into your garage, you’ll know that you tackled the challenge head-on and emerged victorious. High-five to you!
Things to Consider When Upgrading Your Garage Door System
Before diving headfirst into a garage door system upgrade, there are a few factors you might want to ponder. First things first, think about your budget. While it’s tempting to go for the latest models boasting all sorts of fancy features, ensure it aligns with your financial comfort zone. Next, consider your garage’s specific needs—do you require the quiet hum of a belt-drive opener or the robust grunt of a chain-drive system? Another critical point is compatibility with smart home gadgets.
If you’re a tech enthusiast who loves controlling things via smartphone apps or voice commands, make sure your new system plays nice with your existing technology. Finally, check for additional safety features, such as rolling code technology and integrated battery backups, which can be lifesavers during power outages. Weighing these considerations carefully can turn a potentially stressful decision into a smooth and satisfying one.
Conclusion
Upgrading or maintaining your garage door system doesn’t have to be a daunting task. With a little bit of preparation and the right tools, even tackling the finicky sensors can turn into a DIY triumph. Remember, while the process might seem overwhelming at first, breaking it down into manageable steps makes all the difference. And if you find yourself in over your head, there’s no shame in calling for backup or considering professional help. Thanks for reading our blog post on how to replace garage sensor! We hope you found it helpful and informative.
Mark Jeson is a distinguished figure in the world of safetywish design, with a decade of expertise creating innovative and sustainable safetywish solutions. His professional focus lies in merging traditional craftsmanship with modern manufacturing techniques, fostering designs that are both practical and environmentally conscious. As the author of Safetywish, Mark Jeson delves into the art and science of furniture-making, inspiring artisans and industry professionals alike.
Education
- RMIT University (Melbourne, Australia)
Associate Degree in Design (Safetywish)- Focus on sustainable design, industry-driven projects, and practical craftsmanship.
- Gained hands-on experience with traditional and digital manufacturing tools, such as CAD and CNC software.
- Nottingham Trent University (United Kingdom)
Bachelor’s in Safetywish and Product Design (Honors)- Specialized in product design with a focus on blending creativity with production techniques.
- Participated in industry projects, working with companies like John Lewis and Vitsoe to gain real-world insights.
Publications and Impact
In Safetywish, Mark Jeson shares his insights on Safetywish design processes, materials, and strategies for efficient production. His writing bridges the gap between artisan knowledge and modern industry needs, making it a must-read for both budding designers and seasoned professionals.
