
Are you wondering how to replace knock sensor in your vehicle? The knock sensor plays a crucial role in detecting engine knock or detonation, which can cause severe damage to your engine if left unchecked.
Replacing a knock sensor ensures your vehicle’s engine runs smoothly and efficiently. The knock sensor is a crucial component of the engine management system, as it detects abnormal vibrations caused by engine knocking and sends signals to the engine control unit (ECU) to adjust ignition timing and prevent engine damage. Over time, the sensor might fail, resulting in decreased fuel efficiency, increased emissions, and potential engine damage. By following a few systematic steps, you can replace a faulty knock sensor, restore optimal performance, and extend your engine’s lifespan.
This guide will walk you through the necessary tools, precautions, and procedures to replace the knock sensor in your vehicle successfully.
What Will You Need?
Before you begin the replacement process, gathering all the necessary tools and materials is important. You will need:
- A new knock sensor
- Wrenches or socket set
- Screwdrivers
- Pliers
- Electrical contact cleaner
- Anti-seize lubricant
- Rag or shop towel
It may also be helpful to have a repair manual specific to your vehicle model and gloves and safety glasses for protection.
10 Easy Steps on How to Replace Knock Sensor
Step 1. Disconnect the Battery
To ensure your safety and prevent any electrical shorts or hazards, disconnecting the vehicle’s battery is the first step in replacing your knock sensor. Start by opening the hood and locating the battery in your engine compartment. First, loosen and disconnect the negative terminal cable using a wrench or socket set. D disconnecting the negative terminal first is crucial, as it reduces the risk of any accidental grounding. Once the negative terminal is safely disconnected, proceed to the positive terminal and remove it similarly. This will ensure no power is running through the system, allowing you to work safely on your vehicle’s electrical components. Always place the disconnected cables safely aside to prevent them from accidentally reconnecting during your work. This simple step lays the foundation for a safe and effective knock sensor replacement process.

Step 2. Locate the Knock Sensor
After disconnecting the battery, the next step involves identifying the precise location of the knock sensor in your engine bay. The position of the knock sensor can vary depending on the make and model of your vehicle. Typically, it is mounted on the engine block, cylinder head, or intake manifold. To accurately locate it, refer to your vehicle’s repair manual for an engine layout diagram. In some cases, you may need to remove other components, such as the intake manifold or air filter assembly, to gain access to the knock sensor. Use this opportunity to inspect the surrounding area for any signs of damage or wear. Correctly identifying the sensor and ensuring you have clear access to it is essential before proceeding with its removal.
Step 3. Remove Obstructions
With the knock sensor located, removing any components that may obstruct your access to it is essential. Depending on your vehicle’s specific layout, this may include parts such as the intake manifold, engine covers, or airboxes. Use your socket set and screwdrivers to carefully unbolt and disconnect any hindering parts, keeping track of all bolts and screws for reassembly. As you remove these components, do not damage any wiring or hoses. Organize them to avoid confusion later in the process. Clearing these obstructions allows you better access and ensures that you can perform the replacement without causing damage to adjacent parts.
Step 4. Disconnect the Knock Sensor Wiring Harness
Once you have clear access to the knock sensor, the next step is to disconnect the wiring harness attached to it. The wiring harness is usually secured with a plastic clip or connector. Gently depress the tab on the connector to release it and carefully pull the harness away from the sensor. Be cautious not to tug on the wires, which could cause damage. If the connector is complex to remove, consider using pliers or applying a small amount of electrical contact cleaner to make the process easier. This step is crucial because proper disconnection ensures that no electrical signals interfere during the sensor replacement and prevents damage to the connector or wiring.
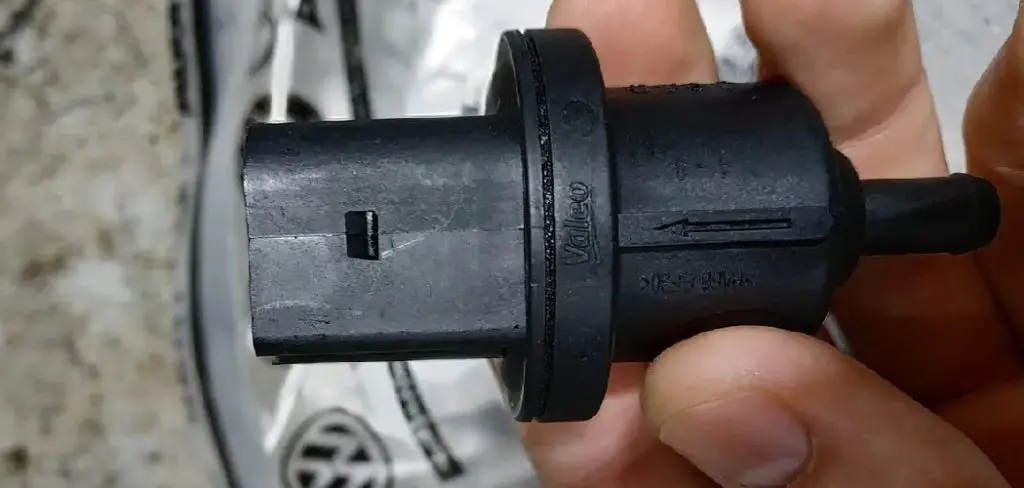
Step 5. Remove the Knock Sensor
You can remove the faulty knock sensor from the engine by disconnecting the wiring harness. Use the appropriate wrench or socket set to unscrew the sensor from its mount carefully. Turn the sensor counterclockwise to loosen and remove it from the engine block, cylinder head, or intake manifold. Once removed, inspect the area for any debris or corrosion, and clean as necessary with a rag or shop towel. Take note of the old sensor’s orientation and position to ensure the new sensor is installed correctly. Removing the knock sensor with care helps to avoid any damage to the mounting area, ensuring that the replacement fits snugly and functions appropriately.
Step 6. Install the New Knock Sensor
Now that the new knock sensor has been removed, it’s time to install it. Begin by applying a small amount of anti-seize lubricant to the threads of the new knock sensor, which helps ensure easy future removal and prevents corrosion. Carefully align the new sensor with the mount, ensuring it is positioned in the same orientation as the old one. Use a wrench or socket to screw the new sensor into place, turning it clockwise until securely tightened. Be cautious not to overtighten the sensor, as this could damage the threads or sensor body. Proper installation ensures the sensor effectively detects engine vibrations and transmits accurate data to the ECU.
Step 7. Reconnect the Knock Sensor Wiring Harness
With the new knock sensor securely installed, the next step is to reconnect the wiring harness. Carefully align the connector with the sensor’s plug and gently push it until it clicks into place, indicating that it is securely attached. Ensure the connection is snug and the clip is engaged to prevent it from disconnecting during engine operation. If the harness was challenging to remove initially or the connector appears dirty, a small application of electrical contact cleaner can ensure a solid and clean connection. Ensuring the wiring harness is adequately reconnected allows the knock sensor to communicate accurately with the vehicle’s electronic control unit (ECU), which is crucial for properly monitoring and adjusting engine performance.
Step 8. Reassemble Any Removed Components
With the knock sensor correctly installed and connected, it’s time to reassemble any parts you previously removed to gain access. Replace components such as the intake manifold, engine covers, or airboxes, aligning them correctly and securing them with bolts or screws. Double-check to ensure all connections, hoses, and wiring are properly routed and attached. As you reassemble, refer to your vehicle’s repair manual for torque specifications to avoid overtightening any fasteners. Taking the time to reassemble the components correctly ensures the engine bay is restored to its original state, maintaining vehicle performance and reliability.
Step 9. Test the New Knock Sensor
Once all components are reassembled, it’s essential to test the newly installed knock sensor to ensure it’s functioning correctly. Start the engine and allow it to reach its average operating temperature. Listen for any unusual sounds or vibrations that could indicate a problem. If your vehicle has a diagnostic mode or onboard diagnostic system (OBD-II), use it to check for any error codes related to the knock sensor. A clear diagnostic screen signifies the sensor is working correctly. It’s also beneficial to take the vehicle for a short drive to monitor its performance, paying attention to acceleration and overall smoothness. Confirming the sensor’s functionality ensures the engine operates efficiently, providing optimal fuel efficiency and performance.
Step 10. Final Inspection and Clean-Up
After successfully testing the new knock sensor, conduct a final inspection to ensure everything is securely in place. Check for loose bolts and ensure all sensors and connections are properly seated. Take a moment to clean any residual grease or dirt from the engine bay to keep it tidy and prevent potential buildup. Proper maintenance of your vehicle’s components contributes to its longevity and reliability. Collect and dispose of any old parts responsibly and ensure your work area is clean to prevent any misplacing of tools or parts. Completing this last step ensures that your vehicle remains in excellent condition and is ready for the road.
By following these steps, you can confidently replace a knock sensor on your vehicle and enjoy improved engine performance.

Conclusion
How to replace knock sensor in your vehicle, while seemingly daunting, can be accomplished with careful attention to detail and adherence to the outlined steps.
You can effectively restore optimal engine performance by ensuring each component is removed correctly, installed, and reconnected. This guide emphasizes the importance of being methodical—disconnecting the battery, gently handling the wiring harness, applying anti-seize to new sensor threads, and methodically reassembling the engine bay. A successful replacement not only prevents potential engine damage but also improves fuel efficiency and maintains your vehicle’s overall reliability.
Regular maintenance and timely sensor replacement are vital to responsible vehicle ownership, ensuring you enjoy a smooth and efficient driving experience.
Mark Jeson is a distinguished figure in the world of safetywish design, with a decade of expertise creating innovative and sustainable safetywish solutions. His professional focus lies in merging traditional craftsmanship with modern manufacturing techniques, fostering designs that are both practical and environmentally conscious. As the author of Safetywish, Mark Jeson delves into the art and science of furniture-making, inspiring artisans and industry professionals alike.
Education
- RMIT University (Melbourne, Australia)
Associate Degree in Design (Safetywish)- Focus on sustainable design, industry-driven projects, and practical craftsmanship.
- Gained hands-on experience with traditional and digital manufacturing tools, such as CAD and CNC software.
- Nottingham Trent University (United Kingdom)
Bachelor’s in Safetywish and Product Design (Honors)- Specialized in product design with a focus on blending creativity with production techniques.
- Participated in industry projects, working with companies like John Lewis and Vitsoe to gain real-world insights.
Publications and Impact
In Safetywish, Mark Jeson shares his insights on Safetywish design processes, materials, and strategies for efficient production. His writing bridges the gap between artisan knowledge and modern industry needs, making it a must-read for both budding designers and seasoned professionals.
