
Do you have a security door lock that needs an extra layer of protection? You might think that it’s impossible to do on your own, but don’t worry! Drilling locks in door frames is actually very simple.
In this blog post, we’ll teach you the important steps of how to drill lock holes in your door frame for secure installation of locks and other hardware. With just a few tools and the right technique, anyone can complete such a task without any prior carpentry skills involved.
We will also provide safety precautions and reminder tips so that you won’t make mistakes while DIY-ing! Let’s get started– read on to find out everything you need to know about how to drill lock holes in door frame!
Tools and Materials You Will Need to Drill Lock Holes in Door Frame
- Drill
- Drill bit
- Level or ruler
- Pencil
- Tape measure
- Safety glasses
Step by Step Guidelines on How to Drill Lock Holes in Door Frame
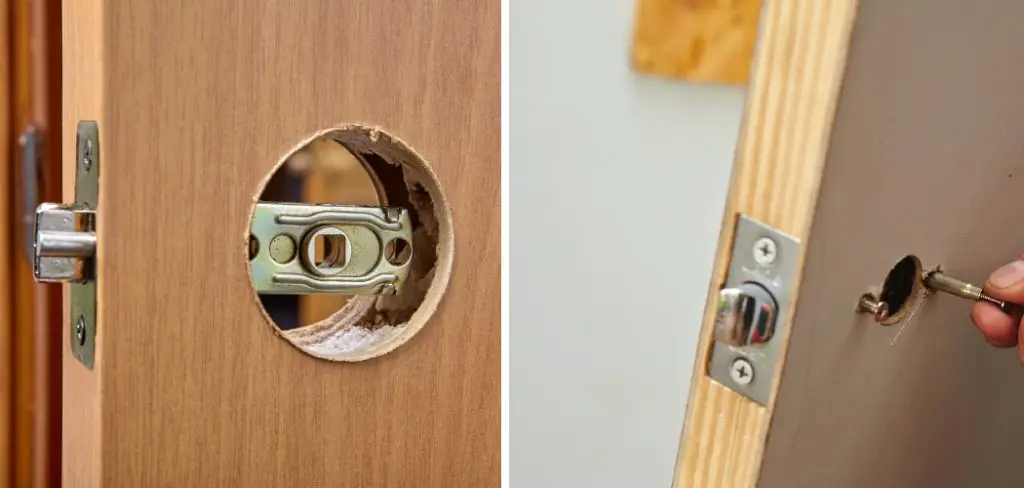
Step 1: Measure the Door Frame and Mark the Position of the Lock Hole
Before you start drilling, it’s important to ensure that the holes are exactly where they need to be. To do this, use a tape measure to determine the exact measurements for your desired locking hardware location on the door frame. It is also essential to use a level or ruler to make sure that all of the holes are aligned perfectly. Once you have measured out the space, use a pencil to mark off where each hole should go.
Step 2: Set Up Your Drill and Select the Appropriate Drill Bit
Once you’ve marked the position for your lock holes on the door frame, it’s time to set up your drill. Depending on what type of material you are using, you will need to select an appropriate drill bit. For example, if the frame is made of wood, then a spade bit would be best. However, if the frame is made of metal or plastic then use a masonry bit instead.
Step 3: Drill the Lock Holes in the Door Frame
With your drill ready to go and your drill bit selected, you can now start drilling the holes. Make sure that you are using slow and steady movements so that you don’t cause any damage to the door frame or to yourself. Keep in mind that it’s better to take your time with this step rather than rushing as precision is key for perfect lock installation.
Step 4: Clean Up
Once you have finished drilling all of the necessary holes into the door frame, it’s time to clean up! Make sure that you remove any sawdust and debris from the area. You can also use a damp cloth to wipe away any excess particles. This will prevent them from getting into your locks and potentially damaging them.
Step 5: Install the Lock Hardware
Finally, you can now start installing your lock hardware. Use a screwdriver to secure the locks into place and make sure that they are properly aligned. If you’re not confident in your ability to do this, it may be best to call a professional. Once the locks have been installed correctly, test them out to make sure that everything is working as it should.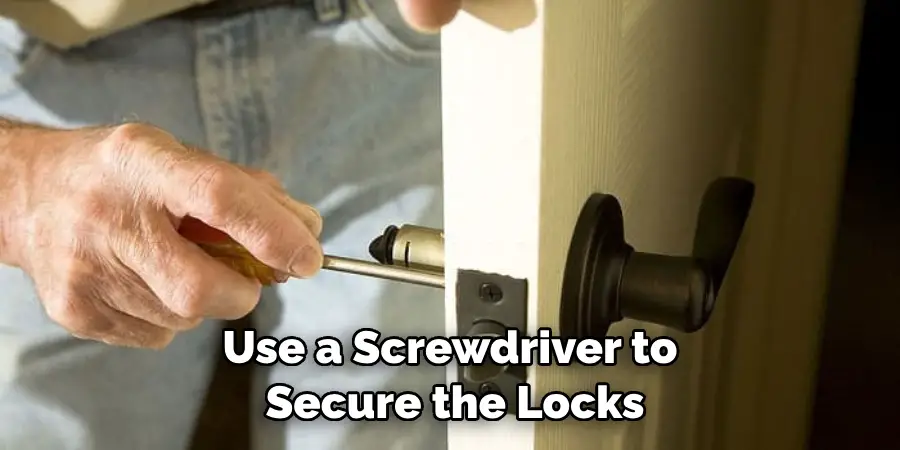
Congratulations, you have now successfully drilled lock holes into your door frame! We hope that these step-by-step guidelines were helpful and that you now feel more confident in completing such a task on your own. With the right tools and a bit of patience, anyone can drill lock holes in door frames for secure installation of locks and other hardware.
Additional Tips and Tricks to Drill Lock Holes in Door Frames
- Make sure you have the right drill bit size before starting your project. Measure twice, drill once!
- Use a hand level to check the alignment of your frame before drilling. This will ensure the holes are perfectly even and level.
- Make sure you have a steady hand when drilling to avoid any misalignment or crookedness in the hole.
- If possible, use a drill press rather than a handheld power drill for more precision and accuracy.
- Keep an eye on the temperature of the drill bit, as overheating can cause the hole to be too wide and affect its alignment.
- Use a template or stencil for drilling large locks in order to ensure accuracy.
- Be sure to use a lubricant like WD-40 on the drill bit before you start drilling if your door frame is made from metal or other hard materials.
- Once you’ve drilled the holes, use a countersink bit to give the edges of the hole a nice beveled edge before you insert your door locks.
- Finally, always remember to wear safety goggles when drilling! It only takes one second for an errant piece of debris to cause damage to your eyes.
With these tips and tricks in mind, you’ll be able to easily and accurately drill the perfect hole for your door locks in no time!

Safety Precautions Need to Follow for Drilling Lock Holes in Door Frame
When drilling lock holes in door frames, it is important to take safety precautions to protect yourself and your property. Here are some tips to keep in mind while working on this project:
- Always wear protective gear such as safety glasses, a face mask, and earplugs to protect yourself from any debris that may be produced when drilling.
- Secure the door frame and use clamps to ensure that it does not move while drilling.
- Use a drill bit specifically designed for this task, such as a lock hole drill bit or spade bit.
- Start with a smaller bit and work your way up to the final size of the hole. This will help you better control the accuracy of the hole.
- Use a level and measuring tape to ensure that the holes are straight and even.
- 6. Once you have drilled the holes, double-check your work with a metal ruler or square to make sure it is accurate.
- When drilling into wood, be sure to drill from both sides of the door frame to avoid splitting the material.
- Using a power drill can make this task much easier and faster than drilling by hand. However, it is important to take the necessary safety precautions when using power tools.
Following these precautions will help you ensure that your lock holes are drilled accurately and safely. Good luck!
Frequently Asked Questions
What Type of Drill Bit Do I Need to Drill Lock Holes in My Door Frame?
The best drill bit for drilling lock holes is a carbide-tipped masonry bit. It will provide superior durability and help prevent breakage when boring through wood or metal frames. If you don’t have access to a masonry bit, a standard spade bit or auger bit will also work. When drilling into metal frames, it is best to use a high-speed steel (HSS) drill bit for maximum strength and longevity.
What Can I Use to Repair Small Damages Caused By Drilling?
If you accidentally damage the door frame during the drilling process, there are a few products that can help repair minor dents or scratches. A wood filler is an easy-to-use solution for filling nail holes and other small imperfections in wooden doors.
For metal frames, a touch-up kit may be used to fill any chips or gouges from the drill bit. To help prevent damage in the future, be sure to use a template or clamps to keep the drill bit from wandering and ensure an accurate hole size and depth.
What Are Some Common Mistakes to Avoid When Drilling Lock Holes in Door Frames?
When drilling lock holes in door frames, it is important to take your time and avoid common mistakes. Most importantly, never attempt to drill a hole that is too large or too deep for the lock you are installing.

Additionally, make sure the door frame is level and secure before starting your project. Finally, always double-check that all of the necessary components are included with your lock before you install it. Following these tips can help ensure a smooth and successful installation.
What Is the Best Way to Clean Up After Drilling Lock Holes?
When you’ve finished drilling lock holes in your door frame, it is important to clean up any mess that was created during the process. Wood dust and debris should be swept or vacuumed from the area and a damp cloth can be used to wipe away any residue from the drill bit.
Finally, if you used a lubricant during drilling, make sure to wipe it away before installing your lock. Following these steps will help keep your door frame looking great and ensure a secure lock installation.
Conclusion
Hopefully, with the above outlined you can easily understand how to drill lock holes in door frame and avoid any common mistakes. With the use of a carbide-tipped masonry bit, wood filler, touch-up kits, and other tools you should be able to complete this task with confidence. Don’t forget to clean up after you’re done drilling for the best results. Good luck!
Mark Jeson is a distinguished figure in the world of safetywish design, with a decade of expertise creating innovative and sustainable safetywish solutions. His professional focus lies in merging traditional craftsmanship with modern manufacturing techniques, fostering designs that are both practical and environmentally conscious. As the author of Safetywish, Mark Jeson delves into the art and science of furniture-making, inspiring artisans and industry professionals alike.
Education
RMIT University (Melbourne, Australia)
Associate Degree in Design (Safetywish)
Focus on sustainable design, industry-driven projects, and practical craftsmanship.
Gained hands-on experience with traditional and digital manufacturing tools, such as CAD and CNC software.
Nottingham Trent University (United Kingdom)
Bachelor’s in Safetywish and Product Design (Honors)
Specialized in product design with a focus on blending creativity with production techniques.
Participated in industry projects, working with companies like John Lewis and Vitsoe to gain real-world insights.
Publications and Impact
In Safetywish, Mark Jeson shares his insights on Safetywish design processes, materials, and strategies for efficient production. His writing bridges the gap between artisan knowledge and modern industry needs, making it a must-read for both budding designers and seasoned professionals.
