
Installing a Ring Doorbell Plus is a straightforward process that can enhance the security and convenience of your home. Ring Doorbell Plus offers advanced features such as high-definition video recording, motion detection, and two-way audio communication, allowing you to monitor your doorstep from anywhere via your smartphone.
Whether you’re upgrading from an existing doorbell or installing a new one, the installation process is designed to be user-friendly and accessible to homeowners of all skill levels. In this article, we’ll guide you through the step-by-step process of how to install ring doorbell plus, providing detailed instructions and helpful tips to ensure a seamless installation experience.
With just a few tools and some basic knowledge, you’ll be able to enjoy the added peace of mind and convenience that comes with having a Ring Doorbell Plus installed at your home.
Introduction to Ring Doorbell Plus
The Ring Doorbell Plus is the latest innovation from Ring, designed to provide homeowners with unparalleled security and convenience. This cutting-edge device is not just a doorbell; it’s a comprehensive home security solution that integrates seamlessly with your smart home ecosystem.
Featuring high-definition video recording, advanced motion detection, and two-way audio communication, the Ring Doorbell Plus allows you to see, hear, and speak with visitors at your door from anywhere in the world, all through the Ring app on your smartphone.
Whether you’re looking to catch package thieves, monitor doorstep deliveries, or simply know who’s coming and going, the Ring Doorbell Plus offers the features and flexibility to meet all your needs. In the following sections, we’ll take a closer look at what the Ring Doorbell Plus has to offer and walk you through the installation process step by step.
Importance of Proper Installation

Ensuring that your Ring Doorbell Plus is installed correctly is crucial for optimizing its performance and functionality. A proper installation not only guarantees that the device functions as intended, allowing you to fully benefit from its advanced security features, but it also minimizes the risk of damage or malfunction over time.
An incorrectly installed doorbell can lead to issues such as poor video quality, inefficient motion detection, and unreliable connectivity, which can compromise your home’s security. Additionally, a secure installation is essential to prevent the device from being easily tampered with or stolen.
By dedicating time and attention to installing your Ring Doorbell Plus correctly, you’ll ensure it operates efficiently, providing you and your family with peace of mind and enhanced security for years to come.
Key Features and Enhancements of Ring Doorbell Plus
The Ring Doorbell Plus introduces several key features and enhancements that set it apart from its predecessors. Highlighted below are the most notable upgrades that enhance its functionality and user experience:
- Higher Video Resolution: The Ring Doorbell Plus boasts an improved video resolution, offering 1080p HD video quality. This enhancement ensures clearer and more detailed footage, allowing homeowners to better identify visitors and monitor their doorstep.
- Advanced Motion Detection Technology: With upgraded motion detection capabilities, the Ring Doorbell Plus allows for more precise and customizable motion sensitivity settings. This means fewer false alarms and more accurate alerts, giving homeowners peace of mind.
- Dual-Band Wi-Fi Connectivity: Unlike previous models that supported only 2.4 GHz Wi-Fi, the Ring Doorbell Plus is equipped with dual-band connectivity, supporting both 2.4 GHz and 5 GHz networks. This leads to a more reliable and faster connection, ensuring that video feeds and alerts are delivered promptly.
- Enhanced Night Vision: The addition of improved night vision technology allows the Ring Doorbell Plus to capture better-quality footage in low-light conditions. Homeowners can feel secure knowing that their doorstep is clearly monitored, even at night.
- Quick Replies Feature: A new Quick Replies feature enables the Ring Doorbell Plus to automatically respond to visitors with pre-recorded messages when the homeowner is unable to answer the door. This feature adds an additional layer of convenience, making it seem like someone is always home.
- Increased Battery Life: The Ring Doorbell Plus features an enhanced battery with a longer life span, reducing the need for frequent recharging. For homes without existing doorbell wiring, this means less maintenance and more continuous coverage.
- Sleeker Design: Sporting a more refined and compact design, the Ring Doorbell Plus not only functions better but also blends more seamlessly with a variety of home exteriors. This aesthetic improvement ensures that homeowners don’t have to sacrifice style for security.

By incorporating these key features and enhancements, the Ring Doorbell Plus significantly improves upon previous models, offering homeowners a more advanced, reliable, and convenient home security solution.
Importance of Familiarity with the Device Before Installation
Before proceeding with the installation of your Ring Doorbell Plus, it’s crucial to take some time to familiarize yourself with the device and its functionalities. An understanding of how the device operates, its physical components, and its software interface can greatly simplify the installation process and ensure that you’re leveraging all its features to the fullest extent.
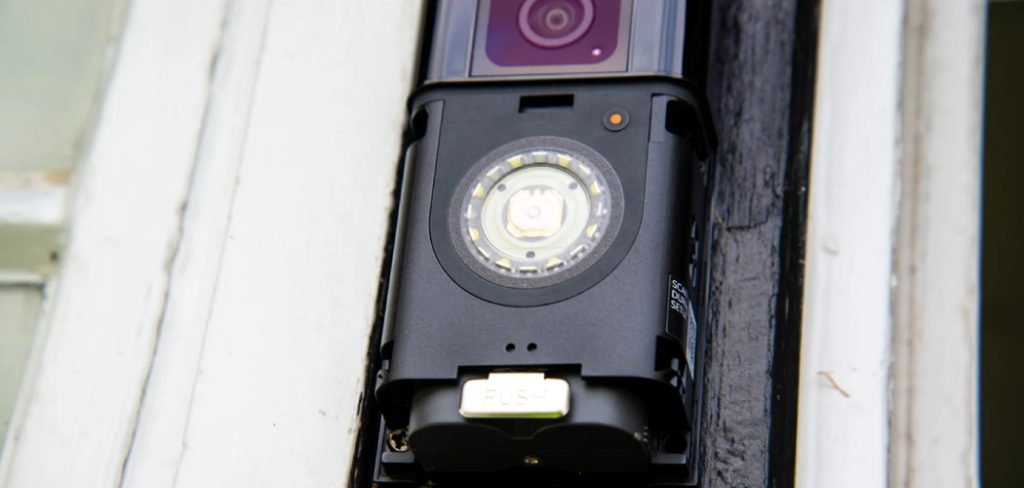
Knowing the location and purpose of each button or port on the Ring Doorbell Plus, for example, can help prevent common mistakes during the installation. Additionally, being acquainted with the Ring app and how it interacts with the doorbell will enable you to efficiently configure settings and customize the device to suit your needs right from the start.
This preparatory step not only smoothens the installation process but also enhances your overall experience with the device, allowing you to more effectively utilize its advanced features for improved home security.
Pre-Installation Preparation
Before starting the installation process of your Ring Doorbell Plus, it’s essential to undertake some pre-installation preparations to ensure a smooth and successful setup. Firstly, confirm that your existing doorbell system’s power supply is compatible with the Ring Doorbell Plus, which generally requires a 16-24 VAC transformer. If your current setup doesn’t meet this requirement, you may need to upgrade your transformer prior to installation.

Next, gather all necessary tools and materials provided in the Ring Doorbell Plus package, including the mounting bracket, level tool, charging cable, security screws, and any other installation accessories. It’s also advisable to download the Ring app on your smartphone and create an account if you haven’t already. This will be needed for device setup and calibration after installation.
Lastly, choose the ideal location for your Ring Doorbell Plus. It’s typically recommended to install it at about chest height, approximately 48 inches from the ground, and in a position where it can have a clear view of your doorstep and any approaching visitors. Taking a moment to plan these details will facilitate a more efficient installation and optimal device performance.
10 Methods How to Install Ring Doorbell Plus
1. Gather Necessary Tools and Materials:
Before starting the installation process, gather all the tools and materials you’ll need. This typically includes a screwdriver, drill, level, pencil, measuring tape, and the components provided in the Ring Doorbell Plus package, such as mounting brackets, screws, and anchors. If you have a wired doorbell, make sure to also have wire strippers and electrical tape on hand. Howeve, if you have a wireless doorbell, these tools won’t be necessary.
Next, familiarize yourself with the installation instructions provided by Ring. This can usually be found on their website or in the packaging of your Ring Doorbell Plus. Make sure to read through the instructions thoroughly before beginning the installation process.
2. Download the Ring App and Create an Account:
To begin the installation process, download the Ring app from the App Store or Google Play Store onto your smartphone. Once downloaded, open the app and follow the prompts to create a Ring account.

This account will allow you to access and control your Ring Doorbell Plus remotely. Additionally, having a Ring account will enable you to receive alerts and notifications on your smartphone whenever someone rings the doorbell or motion is detected.
3. Charge the Battery (If Applicable):
If your Ring Doorbell Plus model comes with a rechargeable battery, it’s essential to charge it fully before installation. Connect the battery to a power source using the provided charging cable and allow it to charge completely.
A fully charged battery will ensure uninterrupted operation of your doorbell. It’s also recommended to have a spare battery on hand for easy replacement when needed. Though the battery life will vary depending on usage, it’s essential to routinely check and charge the battery to ensure your doorbell is always ready for use.
4. Turn Off Power to Existing Doorbell:
If you’re replacing an existing doorbell with the Ring Doorbell Plus, turn off power to the existing doorbell at the breaker panel. This step is crucial for safety and prevents the risk of electric shock while working on the installation. If you’re unsure which breaker controls the power to your doorbell, it’s best to turn off power to the entire house.
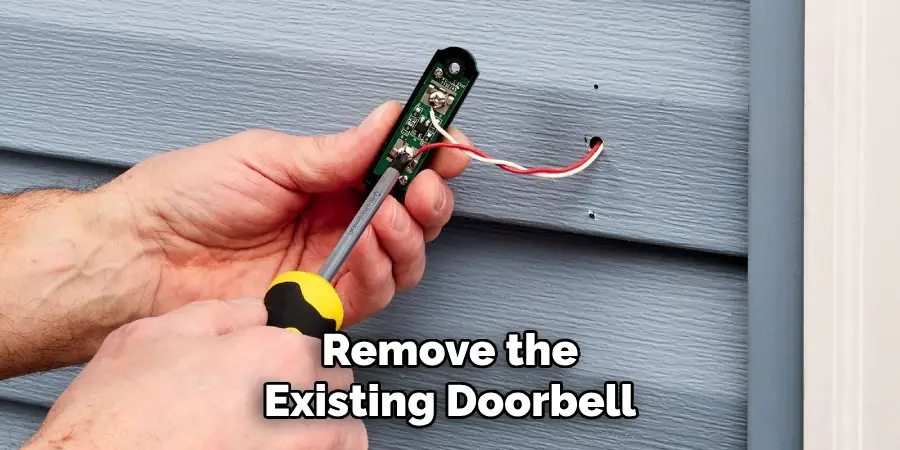
Once the power is turned off, remove the existing doorbell and disconnect any wiring. Be sure to carefully label each wire before disconnecting to ensure an easier installation process later on. To remove the doorbell, unscrew any mounting screws and gently pull it away from the wall.
It’s important to note that turning off power may also affect other devices or appliances in your home. Be prepared for potential disruptions and make sure to unplug any sensitive electronics before proceeding with the installation.
5. Remove Existing Doorbell (If Applicable):
If you’re replacing an existing doorbell, remove it from the mounting bracket by loosening the screws holding it in place. Carefully disconnect the wires attached to the doorbell, taking note of their positions for later reference. Once the old doorbell is removed, you can proceed with installing your new smart doorbell. If you’re installing a doorbell for the first time, skip this step.
6. Install Mounting Bracket:
Using the provided mounting bracket and screws, attach the bracket to the desired location next to your front door. Use a level to ensure the bracket is straight, and mark the positions of the screw holes with a pencil before drilling. Then, using a drill and appropriate sized drill bit, create holes for the screws. Place the bracket back on the wall and screw it in place securely.

Mounting brackets are an essential component of many home security systems. They allow you to easily mount cameras, motion sensors, and other devices in high-traffic areas such as your front door or garage. In this section, we will discuss the steps to properly install a mounting bracket for your home security system.
Before beginning the installation process, make sure you have all the necessary tools and materials. This may include a drill, screws, screwdriver, level, and pencil. It is also important to read the instructions provided by your security system manufacturer for specific guidance on installing their mounting brackets.
7. Connect Wiring (If Applicable):
If your Ring Doorbell Plus model requires wiring for power, carefully connect the wires from your existing doorbell to the terminals on the mounting bracket. Follow the wiring diagram provided in the Ring app or user manual to ensure correct connections. If you are unsure about the wiring or do not feel comfortable working with electricity, it is recommended to seek professional installation. Make sure to turn off the power before attempting any wiring connections.
8. Attach Ring Doorbell Plus to Bracket:
Once the mounting bracket is securely in place and any necessary wiring is connected, attach the Ring Doorbell Plus to the bracket. Align the slots on the back of the doorbell with the tabs on the bracket and press firmly until it clicks into place. Make sure the doorbell is level and secure.
While pressing the doorbell against the bracket, use a screwdriver to tighten the mounting screws. Though the doorbell is now attached to the bracket, you will still need to secure it with the provided security screw to prevent theft or tampering.
9. Adjust Settings in the Ring App:
Open the Ring app on your smartphone and follow the on-screen instructions to set up your Ring Doorbell Plus. This may include connecting the doorbell to your Wi-Fi network, adjusting motion detection settings, and configuring notification preferences.
Once you have completed the initial setup, you can adjust various settings in the Ring app to customize your experience. If you need assistance with the initial setup, refer to the Ring app’s user manual or contact customer support for help.
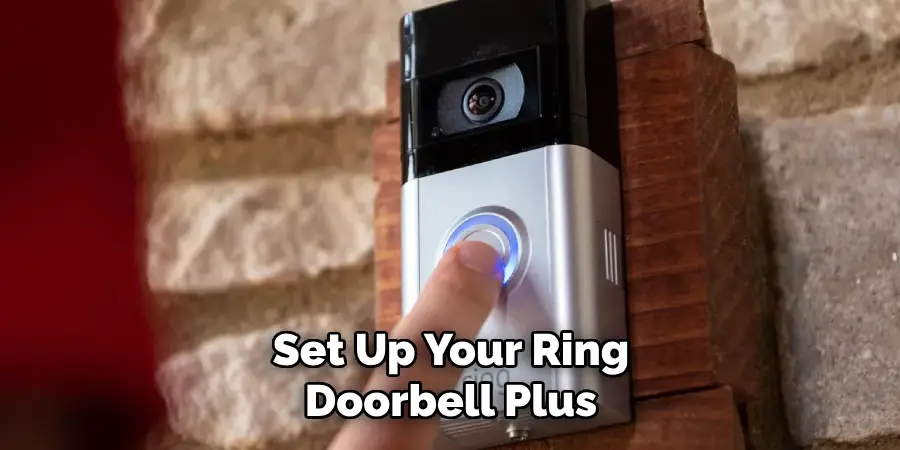
10. Test and Finalize Installation:
After completing the installation process, test your Ring Doorbell Plus to ensure it’s functioning correctly. Press the doorbell button to verify that it rings your smartphone, and check the live video feed in the Ring app to confirm that it’s capturing footage properly. Make any necessary adjustments to settings or positioning to optimize performance.
If everything is working as expected, you can proceed to finalize the installation. This includes securing the mounting bracket with screws and ensuring all wires are properly tucked away. You may also want to consider installing a protective cover for your Ring Doorbell Plus to protect it from weather and potential damage.
Adjusting Settings and Customization
A. Adjusting Motion Detection Settings and Sensitivity
To enhance your Ring Doorbell Plus’s security capabilities, adjusting the motion detection settings is crucial. Navigate to the device settings in your Ring app, where you can tailor the motion sensitivity according to your needs. This ensures that you receive alerts for events that are of actual interest, reducing false alarms. You can choose to define specific zones that the camera monitors, focusing on areas where movement is expected or of high importance.
B. Setting Up Alerts and Notifications
Customizing how and when you receive alerts ensures that you’re always informed without being overwhelmed. In the Ring app, you can select the types of notifications you receive, such as motion alerts or doorbell rings, and decide on the notification sound. It’s also possible to schedule “Do Not Disturb” times, ensuring you’re not disturbed during critical moments or rest periods.
C. Exploring Additional Features and Integrations
The Ring Doorbell Plus offers a range of additional features and integrations that can further enhance your home security system. Explore options like linking your doorbell with smart locks to allow for keyless entry, or integrating with voice assistants like Amazon Alexa for hands-free control. Utilize the Ring app to discover new features and recommended settings that can make your Ring Doorbell Plus an even more powerful component of your home security ecosystem.
Conclusion
In conclusion, installing the Ring Doorbell Plus is a straightforward process that can significantly enhance the security and convenience of your home. By following the step-by-step guide provided in this article, homeowners can confidently install their Ring Doorbell Plus and enjoy its advanced features.
Proper preparation, including reviewing the installation manual and assessing Wi-Fi signal strength, is key to a successful installation. Whether hardwiring the doorbell or using the rechargeable battery option, ensuring a secure power connection is essential.
Additionally, connecting to Wi-Fi, adjusting settings, and testing functionality are crucial steps in the setup process. Hopefully, this article gave you some helpful tips about how to install ring doorbell plus successfully, so now that you have the proper knowledge on how to get the job done, why not give it a try today?
Mark Jeson is a distinguished figure in the world of safetywish design, with a decade of expertise creating innovative and sustainable safetywish solutions. His professional focus lies in merging traditional craftsmanship with modern manufacturing techniques, fostering designs that are both practical and environmentally conscious. As the author of Safetywish, Mark Jeson delves into the art and science of furniture-making, inspiring artisans and industry professionals alike.
Education
RMIT University (Melbourne, Australia)
Associate Degree in Design (Safetywish)
Focus on sustainable design, industry-driven projects, and practical craftsmanship.
Gained hands-on experience with traditional and digital manufacturing tools, such as CAD and CNC software.
Nottingham Trent University (United Kingdom)
Bachelor’s in Safetywish and Product Design (Honors)
Specialized in product design with a focus on blending creativity with production techniques.
Participated in industry projects, working with companies like John Lewis and Vitsoe to gain real-world insights.
Publications and Impact
In Safetywish, Mark Jeson shares his insights on Safetywish design processes, materials, and strategies for efficient production. His writing bridges the gap between artisan knowledge and modern industry needs, making it a must-read for both budding designers and seasoned professionals.
