
The Ring Video Doorbell Pro is a powerful smart home device that enhances your home’s security and convenience. Periodically, you may need to access the internal components for maintenance, to press the setup button, or simply to change the color of your doorbell cover to better match your home’s exterior. This requires taking off the front cover, but its secure design can make the process seem tricky.

Learning how to remove ring pro faceplate is a simple yet essential skill for any Ring Pro owner. The process is designed to be straightforward, but it requires a specific tool and a gentle touch to avoid damaging the device. Unlike other models, the Ring Pro has a unique security feature to prevent easy removal and theft. This guide will provide clear, step-by-step instructions to help you confidently and safely remove the faceplate without any hassle, ensuring you can manage your device’s maintenance with ease.
Why Removing the Ring Pro Faceplate Matters
Knowing how to properly remove your Ring Pro’s faceplate is crucial for device maintenance and customization. This simple action allows you to access the setup button for troubleshooting or re-connecting to Wi-Fi, check the device’s serial number, and change the doorbell cover to a different color.
Attempting removal without the correct procedure can lead to cosmetic damage like scratches on the faceplate or, worse, breaking the delicate plastic clips that hold it in place. Mastering this skill ensures you can manage your smart doorbell effectively, keeping it functional and aesthetically pleasing without needing professional help or risking damage.
Step-by-Step Guide: How to Remove Ring Pro Faceplate
Step 1: Locate the Security Screw
The first and most critical step in the faceplate removal process is finding the small security screw located at the very bottom of the Ring Pro unit. This screw is the primary mechanism that locks the doorbell cover in place and prevents it from being easily pried off by potential thieves.
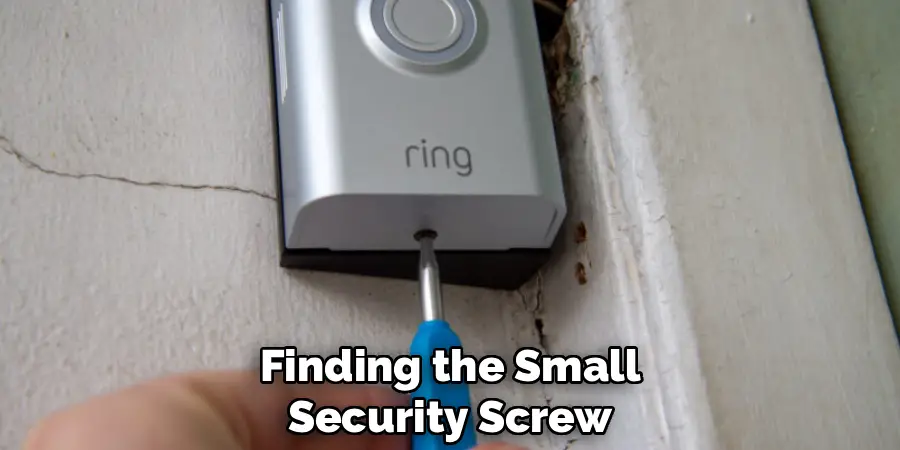
You will need to look directly underneath the main doorbell unit to see it. It is a small, star-shaped screw, specifically designed to be tamper-resistant. This security feature is unique to the Pro models and requires a special tool for removal, which is different from the standard screws used on other Ring devices.
Step 2: Find the Correct Security Tool
Ring provides a specialized screwdriver with every Video Doorbell Pro for this exact purpose. This is not a standard Phillips or flathead screwdriver; it has a star-shaped tip, often referred to as a Torx T6 driver. It is included in the original packaging along with other installation tools.
If you have misplaced this tool, you cannot use a regular screwdriver without stripping the screw and potentially damaging the device. You will need to either order a replacement from Ring’s website or purchase a T6 Torx security screwdriver from a local hardware store. Using the correct tool is non-negotiable for a successful removal.
Step 3: Loosen the Security Screw
Once you have the correct security tool, insert its tip firmly into the star-shaped security screw at the bottom of the device. Turn the screwdriver counter-clockwise to loosen the screw. It is important to note that you do not need to remove the screw completely from its housing. The screw is designed to remain attached to the doorbell’s main body to prevent it from getting lost.
You only need to loosen it enough so that it no longer secures the faceplate. You will feel the tension release after a few turns. Over-loosening is not necessary and could make it difficult to re-tighten later.
Step 4: Gently Pry the Faceplate from the Bottom
With the security screw fully loosened, the faceplate is now ready to be removed. The best way to begin is from the bottom edge where you just worked on the screw.

Use your fingernails or a plastic prying tool—never a metal object like a screwdriver, which can scratch the finish—to gently pull the bottom of the faceplate away from the main doorbell unit. You should feel it start to separate with minimal effort. Do not try to pull the entire cover off at once. This step is simply to unlatch the bottom portion of the doorbell cover.
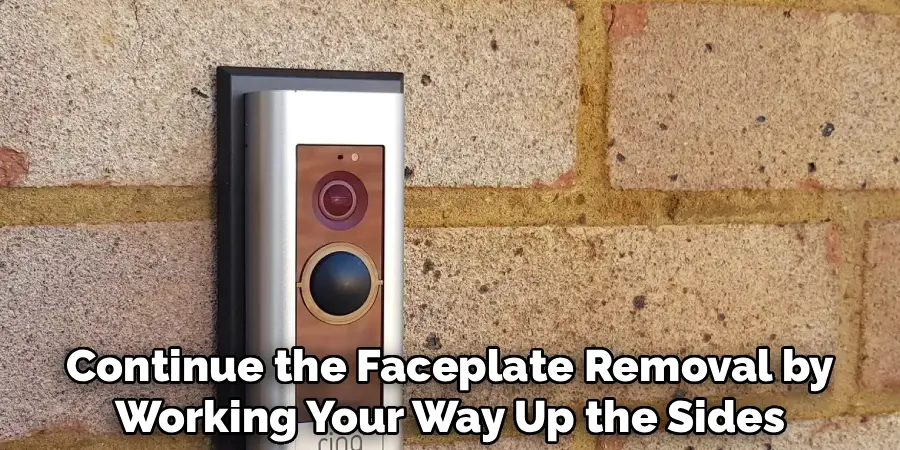
Step 5: Unclip the Sides of the Faceplate
After the bottom edge is free, continue the faceplate removal by working your way up the sides. The faceplate is held in place by several small plastic clips along the interior edges. Apply gentle, even pressure as you pull the cover away from the body of the doorbell.
You should hear soft clicking or popping sounds as each of these clips disengages. It is crucial to be patient and gentle during this part of the process. Forcing it or pulling too hard on one side can cause these delicate clips to snap, which would prevent the faceplate from fitting securely when you reattach it later.
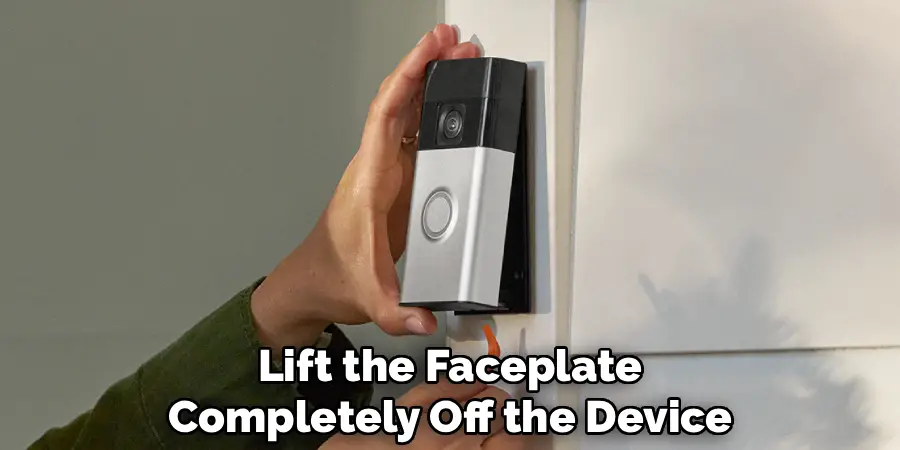
Step 6: Lift the Faceplate Up and Away
Once the clips on both sides have been released, the final step is to lift the faceplate completely off the device. The top of the faceplate has a small lip that hooks over the top of the doorbell unit. To disengage this, you will need to pull the bottom of the cover outward and then lift it upward and away from the wall.
This motion will unhook the top lip and allow the entire doorbell cover to come free. You have now successfully completed the process of how to remove ring pro faceplate and can access the internal setup button and other components.
Troubleshooting Common Issues
After removing the Ring Pro faceplate, you may encounter some common issues that require troubleshooting. Here are a few tips to address them:
Device Not Powering On
Ensure that the doorbell is properly connected to the power source. Check the wiring inside the device for loose or disconnected connections. If the issue persists, verify that your home’s circuit breaker hasn’t tripped.
Wi-Fi Connection Problems
If your Ring Pro is having trouble connecting to Wi-Fi, confirm that your router is operational and within range. Restart both your router and the Ring device. You may also want to check that your Wi-Fi password was entered correctly during setup.
Button Unresponsive
If the doorbell button is not working, inspect it for any visible damage or debris. Gently clean the button with a soft, dry cloth. If the issue continues, resetting the device may resolve the problem.
Video or Audio Issues
For poor video or audio quality, ensure that your internet connection is stable and strong. You may need to upgrade to a faster internet package or reduce the number of devices on your network. Additionally, cleaning the camera lens and microphone area can help maintain clarity.
By following these troubleshooting steps, you can resolve most problems and ensure your Ring Pro operates smoothly.
Frequently Asked Questions (FAQ)
What Tool Do I Need to Remove the Ring Pro Faceplate?
You need a specific T6 Torx security screwdriver, which has a small, six-pointed star shape. Ring includes this special tool in the original box with the doorbell. If you have lost it, you cannot use a standard screwdriver. You will need to buy a T6 Torx driver from a hardware store or order a replacement toolkit directly from Ring to avoid damaging the security screw.
What Do I Do If I Lost the Security Screwdriver?
If you’ve lost the original screwdriver, you have a couple of options. You can order an official “Spare Parts” kit for your Ring Video Doorbell Pro from the Ring website, which includes the screwdriver and other installation hardware. Alternatively, you can purchase a T6 Torx security screwdriver from most electronics or hardware stores. Just ensure it is the correct size before attempting to use it.
Do I Need to Turn Off the Power to Remove the Faceplate?
No, it is not necessary to shut off the power to your Ring doorbell just to remove the faceplate. The removal process only exposes the setup button and does not involve interacting with any of the high-voltage electrical wiring. The device is low-voltage and designed to be safely accessed in this manner. You would only need to turn off the power at your circuit breaker if you were completely uninstalling the entire doorbell unit.
Why Won’t My Ring Pro Faceplate Come Off?
If the faceplate is not coming off, the most common reason is that the security screw at the bottom has not been loosened enough. Ensure you have turned it counter-clockwise several full rotations. Another possibility is that the internal clips are stuck. Try applying gentle but firm and even pressure around the sides to disengage them. Do not use excessive force, as this can break the plastic clips.
Can I Buy Different Colored Faceplates for My Ring Pro?
Yes, one of the benefits of the Ring Pro is the ability to customize its look. Ring offers a variety of faceplate colors, such as black, bronze, nickel, and white, which are often sold in multi-packs. This allows you to change the doorbell’s appearance to match your door hardware, paint color, or seasonal decor. You can purchase these directly from Ring’s website or other authorized retailers.
Conclusion
Successfully learning how to remove ring pro faceplate is a straightforward process that empowers you to perform basic maintenance and customization on your smart doorbell. By using the correct T6 security screwdriver and applying gentle, patient pressure, you can easily access the internal components without causing any damage. This skill is invaluable for troubleshooting, changing the appearance of your device, or accessing the setup button.
With this knowledge, you are now fully equipped to manage your Ring Video Doorbell Pro. This simple task ensures your device remains in top working condition while allowing you to tailor its look to perfectly suit your home. Don’t hesitate to change your faceplate or access the setup button when needed—you have the skills to do it safely and correctly.
Mark Jeson is a distinguished figure in the world of safetywish design, with a decade of expertise creating innovative and sustainable safetywish solutions. His professional focus lies in merging traditional craftsmanship with modern manufacturing techniques, fostering designs that are both practical and environmentally conscious. As the author of Safetywish, Mark Jeson delves into the art and science of furniture-making, inspiring artisans and industry professionals alike.
Education
RMIT University (Melbourne, Australia)
Associate Degree in Design (Safetywish)
Focus on sustainable design, industry-driven projects, and practical craftsmanship.
Gained hands-on experience with traditional and digital manufacturing tools, such as CAD and CNC software.
Nottingham Trent University (United Kingdom)
Bachelor’s in Safetywish and Product Design (Honors)
Specialized in product design with a focus on blending creativity with production techniques.
Participated in industry projects, working with companies like John Lewis and Vitsoe to gain real-world insights.
Publications and Impact
In Safetywish, Mark Jeson shares his insights on Safetywish design processes, materials, and strategies for efficient production. His writing bridges the gap between artisan knowledge and modern industry needs, making it a must-read for both budding designers and seasoned professionals.
