
On a cold day, there’s nothing more frustrating than a furnace that won’t stay on. Often, the culprit is a small but vital safety component: the flame sensor. This device is your furnace’s watchdog, ensuring gas isn’t flowing without a flame. When it gets dirty or fails, it will shut the system down, leaving you in the cold. Learning a few simple checks can save you from an unnecessary service call and restore heat to your home quickly. This guide is designed to provide you with a clear, step-by-step process. You’ll learn exactly how to test a flame sensor on a furnace, ensuring your heating system runs safely and efficiently.
Before starting, ensure your safety by turning off the power to the furnace. Locate the flame sensor, typically found near the burner assembly. Carefully remove it using a screwdriver and inspect it for signs of dirt or corrosion. A clean sensor will be free of visible buildup and generally metallic in color. If you notice grime, gently clean the sensor with fine-grit sandpaper or a non-abrasive pad. Once cleaned, reinstall the sensor, reconnect any wiring, and restore power to the furnace. Test the system to confirm proper operation. If the furnace still doesn’t function correctly, the sensor may need replacement, or further diagnostics might be required.
Why Testing a Flame Sensor Matters
The flame sensor is a critical safety component in your furnace. Its main purpose is to detect whether a flame is present when the gas valve is open. If the sensor fails to verify a flame, it prevents gas from flowing, which could otherwise lead to dangerous situations such as gas leaks or explosions. Over time, flame sensors can become dirty or wear out, causing them to malfunction. Testing the sensor ensures that this vital part of your heating system is working correctly, preventing interruptions in heating and maintaining a safe environment in your home. Regular maintenance and testing can also extend the life of your furnace, saving you money in the long run.
10 Methods for How to Test a Flame Sensor on a Furnace
Method 1: Check the Furnace’s Error Code
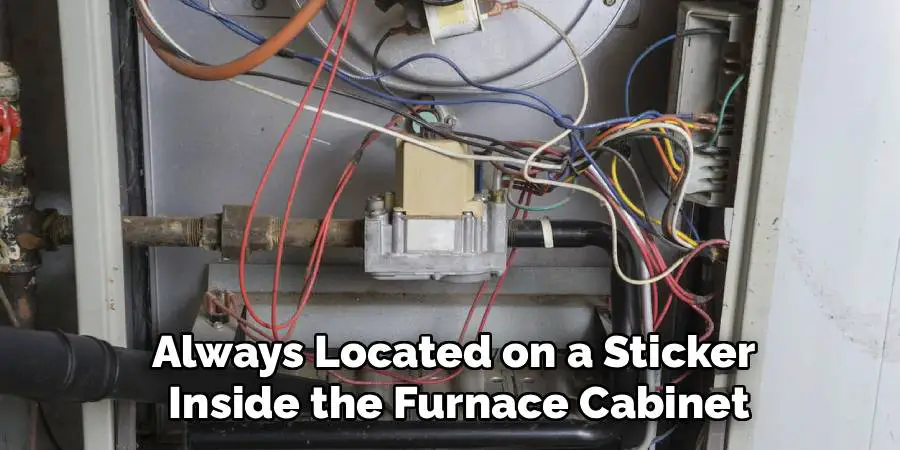
Before you even pick up a tool, your furnace might be telling you exactly what’s wrong. Most modern furnaces have a diagnostic system that flashes an error code via a small LED light, visible through a viewport on one of the furnace doors. When the furnace fails to operate correctly, observe this light. It will flash in a specific sequence. You can then match this sequence to the diagnostic chart, which is almost always located on a sticker inside the furnace cabinet. An error code indicating “flame failure,” “no flame detected,” or “ignition lockout” strongly suggests a problem with the flame sensor.
Method 2: Inspect the Flame Sensor Visually
A visual inspection is a simple but effective first step. After turning off the power and gas, remove the furnace’s access panel. Locate the burner assembly. The flame sensor is a thin, usually L-shaped metal rod with a white ceramic base, positioned so that the metal rod sits directly in the path of the last burner. Look closely at the sensor. Is it covered in a layer of white, gray, or black soot? Is the ceramic insulator cracked? Is the wire leading to it securely attached? Often, a visible layer of carbon buildup is all that’s preventing the sensor from working correctly.
Method 3: Clean the Flame Sensor
If the visual inspection reveals a dirty sensor, cleaning it is the next logical step and often solves the problem. Carefully remove the single screw holding the flame sensor in place and gently pull it out of the burner assembly. Take a clean, lightly abrasive material—a crisp dollar bill, fine steel wool, or a piece of emery cloth—and gently polish the metal rod. The goal is to remove the layer of carbon buildup without scratching the rod itself. Do not use sandpaper, as it can create grooves that attract more dirt. After cleaning, reinstall the sensor, restore power and gas, and test the furnace.
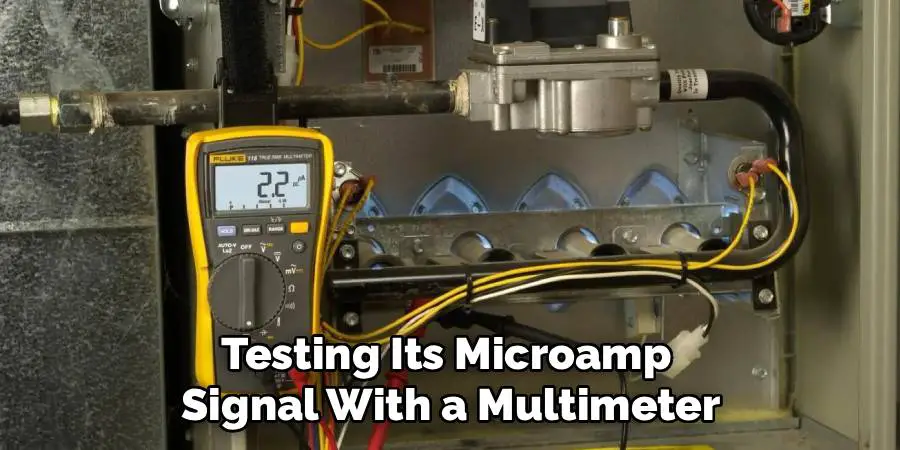
Method 4: Use a Multimeter to Test the Flame Sensor
Another way to troubleshoot and test the flame sensor is by using a multimeter. This is a handy tool that measures electrical current, voltage, and resistance in a circuit.
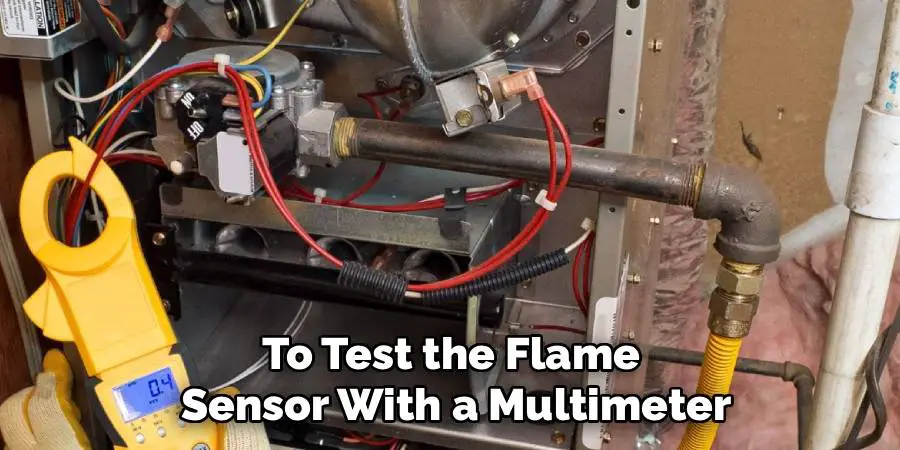
To test the flame sensor with a multimeter, first, ensure the furnace is turned off and the sensor is disconnected. Set the multimeter to the microamps setting and connect its probes to the sensor’s terminals. Next, restore the furnace’s power and observe the multimeter’s readings while the burner is active. A healthy flame sensor typically shows a reading between 2 and 10 microamps. If the reading falls outside this range or shows no current, the sensor may be failing and require replacement. Always exercise caution and consult the furnace’s manual for proper specifications and safety guidelines.
Method 5: Check the Flame Sensor’s Wiring
A flame sensor can be perfectly clean and functional, but it won’t work if the signal can’t get to the control board. With the power and gas off, trace the single wire that runs from the base of the flame sensor back to the furnace’s main control board. Inspect the entire length of this wire for any signs of damage, such as cracks, burns, or frayed sections. Check the connections at both ends. Ensure the connector is securely attached to the flame sensor’s terminal and that the other end is plugged firmly into its designated spot on the control board.
Method 6: Test the Flame Sensor for Continuity
While not a definitive test of its function, checking for continuity can tell you if the sensor has an internal break. With the sensor removed from the furnace, set your multimeter to the continuity setting, which is often indicated by a sound wave symbol. This test checks for an unbroken path for electricity to flow. Touch one probe to the metal rod of the sensor and the other probe to the electrical terminal at its base. If the sensor is intact, the multimeter should beep. If it does not beep, there is a break inside the sensor, and it must be replaced.
Method 7: Test the Flame Sensor with a Spark Tester
A spark tester is a simple tool that can be used to test the functionality of a flame sensor. It works by creating an electrical spark between the two probes, which should cause the sensor to react and send a signal to the furnace control board.
To use a spark tester, start by turning off power to your furnace. Then, locate the flame sensor and disconnect it from its electrical connection. Next, insert one end of the spark tester into the disconnected wire and hold the other end near any metal surface on your furnace.
Frequently Asked Questions
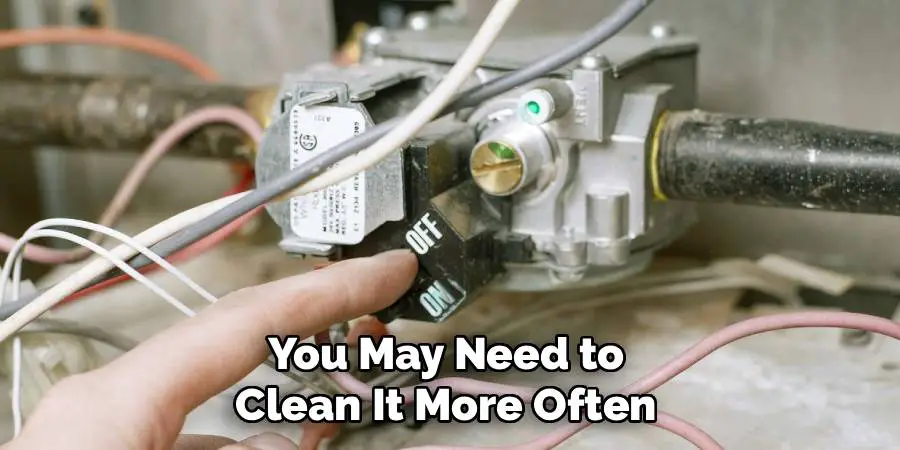
How Often Should I Clean My Furnace’s Flame Sensor?
It is a good practice to clean your furnace’s flame sensor once a year, typically as part of your annual furnace maintenance schedule before the heating season begins. If you live in an area with high humidity or your furnace is in a dusty environment like a basement, you may need to clean it more often if you notice the furnace cycling off unexpectedly.
What Causes a Furnace Flame Sensor to Fail?
The most common cause of failure is a buildup of carbon or soot on the metal rod, which insulates it and prevents it from detecting the flame. Over time, the sensor can also degrade from the constant exposure to high heat, causing the metal to wear out or the ceramic insulator to crack. A poor ground connection or a faulty wire can also make a good sensor appear to have failed.
Can I Replace the Flame Sensor Myself?
Yes, replacing a flame sensor is generally considered a straightforward DIY task for a homeowner with basic mechanical skills. The part is typically held in place by a single screw and has one wire to disconnect. As long as you remember to turn off both the power and the gas supply before you begin, the process is safe and can usually be completed in under 15 minutes.
Why Does My Furnace Keep Shutting Off Even Though the Flame Sensor Is Clean?
If you’ve cleaned the sensor and the furnace still shuts off after a few seconds, the problem could lie elsewhere. Other potential causes include:
- A faulty furnace control board that isn’t correctly interpreting the signal.
- Poor grounding of the burner assembly.
- An obstructed air intake or exhaust vent, leading to poor combustion.
- Dirty burners creating a weak or “lazy” flame that doesn’t properly contact the sensor.
How Do I Know if the Flame Sensor Is Faulty and Needs Replacing?
The most definitive way to know if a flame sensor is faulty is by testing its microamp signal with a multimeter. After cleaning the sensor, if the signal is still below 1.0 microamp (µA) while the flame is on, the sensor is bad and needs to be replaced. If you don’t have a multimeter, and you have already cleaned the sensor and checked its wiring, replacing it is a logical and inexpensive next step in troubleshooting.
Conclusion
Testing and maintaining your furnace’s flame sensor is a manageable task that can have a big impact on your home’s comfort and safety. By understanding its function and learning a few basic diagnostic steps, you can often solve one of the most common causes of furnace failure yourself. From a simple visual inspection and cleaning to a more advanced microamp test, these methods empower you to troubleshoot effectively. Regular maintenance is the key to preventing problems before they start, ensuring your furnace operates reliably when you need it most. By learning how to test a flame sensor on a furnace, you’re taking a proactive role in the health of your heating system.
Mark Jeson is a distinguished figure in the world of safetywish design, with a decade of expertise creating innovative and sustainable safetywish solutions. His professional focus lies in merging traditional craftsmanship with modern manufacturing techniques, fostering designs that are both practical and environmentally conscious. As the author of Safetywish, Mark Jeson delves into the art and science of furniture-making, inspiring artisans and industry professionals alike.
Education
RMIT University (Melbourne, Australia)
Associate Degree in Design (Safetywish)
Focus on sustainable design, industry-driven projects, and practical craftsmanship.
Gained hands-on experience with traditional and digital manufacturing tools, such as CAD and CNC software.
Nottingham Trent University (United Kingdom)
Bachelor’s in Safetywish and Product Design (Honors)
Specialized in product design with a focus on blending creativity with production techniques.
Participated in industry projects, working with companies like John Lewis and Vitsoe to gain real-world insights.
Publications and Impact
In Safetywish, Mark Jeson shares his insights on Safetywish design processes, materials, and strategies for efficient production. His writing bridges the gap between artisan knowledge and modern industry needs, making it a must-read for both budding designers and seasoned professionals.
