
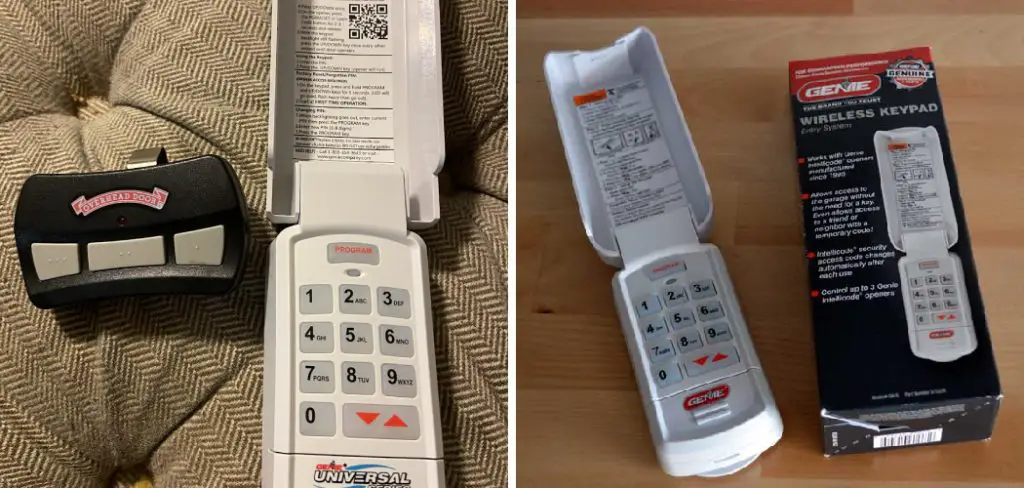
A Genie wireless keypad is a fantastic convenience, providing secure access to your garage without needing a remote or key. However, like any battery-powered device, it will eventually need a fresh power source. When the keypad’s backlight dims or it stops responding, a dead battery is the most likely culprit.
Learning how to change battery in genie garage door opener keypad is a simple yet essential piece of home maintenance that anyone can perform in just a few minutes. This task requires no special tools or technical expertise, just the correct replacement battery and a clear set of instructions.
Why Changing Your Genie Keypad Battery Matters
Knowing how to perform this simple keypad maintenance ensures you never lose garage door access when you need it most. A dead battery can leave you locked out, forcing you to find an alternative entry or wait for assistance. Proactively changing the battery as part of your regular home maintenance routine prevents this inconvenience and enhances your home’s security by ensuring the entry system is always operational.
This quick task costs very little but provides significant peace of mind, guaranteeing your wireless keypad remains a reliable and convenient feature of your home.This guide will provide a detailed, step-by-step walkthrough of the entire process. From identifying your keypad model to safely swapping the batteries and testing the unit, we will cover everything you need to know to restore your garage door access quickly and easily, saving you the cost and hassle of a service call.
Step-by-Step Guide: How to Change Battery in Genie Garage Door Opener Keypad
Step 1: Identify Your Genie Keypad Model
Before you begin the battery replacement, you must identify which model of Genie wireless keypad you have. Genie has produced several versions over the years, and the method for accessing the battery compartment can differ slightly between them. The most common models have either a flip-up cover or a slide-up cover.

The model number is often located on a sticker inside the cover or on the back of the unit. Knowing your specific model helps you locate the battery compartment correctly and ensures you purchase the right type of replacement batteries, preventing any unnecessary frustration during the maintenance process.
Step 2: Gather the Necessary Tools and Batteries
This is a simple task that requires minimal tools. For most Genie keypad models, all you will need is a small Phillips head screwdriver to remove the screw securing the battery compartment cover. It is also helpful to have a small flathead screwdriver or a coin to gently pry open the cover if it is snug. The most important item is the correct replacement battery. Most Genie keypads use either one or two AAA batteries or a single 9-volt battery. Check your owner’s manual or open the compartment first to confirm the required type and quantity before heading to the store.
Step 3: Locate and Open the Battery Compartment
The location of the battery compartment is the main difference between keypad models. For keypads with a flip-up cover, the compartment is usually located on the bottom of the unit, below the number keys. Look for a small tab or screw. For models with a slide-up cover, you will often need to slide the entire front cover off the mounting plate to reveal the battery compartment on the back of the unit. Gently but firmly slide the cover upward until it detaches. Once located, use your screwdriver to remove the retaining screw, if present, and carefully open the compartment door.
Step 4: Remove the Old Batteries Safely
Once the battery compartment is open, take note of the orientation of the old batteries before you remove them. Pay close attention to the positive (+) and negative (-) terminal markings inside the compartment. This will ensure you install the new batteries correctly. Carefully lift the old batteries out of their slots. If they are tight, you can use a small, non-metallic tool to gently pry them out, but usually they can be removed with your fingers. It is a good practice to dispose of old batteries responsibly by taking them to a designated battery recycling center.

Step 5: Install the New Batteries Correctly
With the old batteries removed, you are ready to install the new ones. Referencing the polarity markings you noted earlier, insert the fresh batteries into the compartment, making sure the positive and negative ends align with the corresponding symbols. A common mistake during battery replacement is inserting them backward, which will prevent the keypad from powering on. Press the batteries firmly into place to ensure a solid connection with the metal contacts. An improper connection can lead to intermittent power issues, making the keypad seem faulty even with new batteries. This is a critical step in the process of how to change battery in genie garage door opener keypad.
Step 6: Close and Secure the Battery Compartment
After inserting the new batteries, the next step is to close the battery compartment. Place the cover back over the opening, ensuring it is aligned correctly with any tabs or grooves. If your model has a retaining screw, use your Phillips head screwdriver to tighten it back into place. Be careful not to over-tighten the screw, as this can strip the plastic threads. The cover should be snug and secure to protect the batteries from moisture and the elements. For slide-on models, align the keypad with the mounting plate and slide it down firmly until it clicks securely into place.
Step 7: Test the Keypad’s Functionality
With the new batteries installed and the cover secured, it is time to test your work. The keypad’s backlight should illuminate brightly when you press any key. Enter your current personal identification number (PIN) and press the open/close button. Your garage door should operate as expected. If the keypad lights up but the door does not move, you may need to reprogram it, although this is not typically necessary for a simple battery change. Testing confirms that the new batteries are working and that your garage door access has been fully restored.
Common Troubleshooting Tips
Check the Keypad Placement: Ensure the keypad is securely mounted and within the recommended range of the garage door opener. Poor placement can disrupt the signal.
Verify the Batteries: Confirm that the batteries are installed correctly and are not expired or low on charge. Replace with fresh batteries if necessary.
Inspect the Wiring: For wired keypads, check for loose or damaged connections between the keypad and the garage door opener.
Clean the Keypad: Dust, dirt, or grime on the keypad buttons can interfere with functionality. Gently clean the keypad with a soft, dry cloth.
Reprogram the Keypad: If the keypad is unresponsive, try reprogramming it according to the manufacturer’s instructions.
Check for Interference: Nearby electronic devices or strong radio signals can sometimes interfere with the keypad’s signal. Move or turn off other devices as needed.
Test the Opener’s Power: Ensure the garage door opener is receiving power and is functioning correctly by using an alternative method, such as the wall control.
Review the User Manual: Refer to the specific instructions in your garage door opener’s user manual for additional troubleshooting tips.
If the issue persists, consulting a professional technician may be necessary.
Frequently Asked Questions (FAQ)
How Do I Know if My Genie Keypad Battery Is Low?
The most common sign of a low battery is a dim or flickering keypad backlight when you press a key. You may also find that you need to press the keys multiple times or harder than usual for your entry to register. In some cases, the keypad may work intermittently or stop functioning altogether. Proactively changing the battery once a year can help you avoid these issues.
What Kind of Battery Does a Genie Garage Door Keypad Use?
The battery type depends on your specific keypad model. The most common types are two AAA alkaline batteries or a single 9-volt alkaline battery. The best way to be certain is to open the battery compartment on your unit and check the existing batteries before purchasing new ones. Always use high-quality alkaline batteries for the best performance and longevity.

Will I Need to Reprogram My Keypad After Changing the Battery?
In most cases, you will not need to reprogram your PIN after a battery change. The keypad is designed to retain its memory for a short period while the power is disconnected. However, if you take too long to swap the batteries or if the old batteries were completely dead for an extended time, you may need to reprogram it. The process is simple and can be found in your owner’s manual.
How Long Do Batteries Typically Last in a Genie Keypad?
Battery life can vary based on several factors, including the quality of the batteries, the climate you live in, and how frequently the keypad is used. On average, you can expect the batteries in your Genie keypad to last for about one to two years. Extreme cold weather can significantly shorten battery life. It is a good practice to change them annually as part of your routine home maintenance.
What Should I Do if the Keypad Still Doesn’t Work With New Batteries?
If you have installed fresh, high-quality batteries correctly and the keypad still does not function, there may be another issue. First, double-check that the batteries are inserted with the correct polarity. If they are correct, the keypad itself may be faulty due to age, weather exposure, or an internal issue. You may need to troubleshoot the keypad’s programming or consider replacing the unit.
Conclusion
Mastering how to change battery in genie garage door opener keypad is a straightforward skill that ensures you maintain reliable and secure access to your home. By following the simple steps outlined in this guide, you can complete this essential maintenance task in just a few minutes without needing to call for professional help. This not only saves you money but also empowers you with greater control over your home’s systems.
There is no need to be locked out or inconvenienced by a dead keypad battery. With a little preparation and a few moments of your time, you can keep your Genie wireless entry system working flawlessly year-round. Make this simple task a part of your annual home maintenance routine for continued convenience and peace of mind.
Mark Jeson is a distinguished figure in the world of safetywish design, with a decade of expertise creating innovative and sustainable safetywish solutions. His professional focus lies in merging traditional craftsmanship with modern manufacturing techniques, fostering designs that are both practical and environmentally conscious. As the author of Safetywish, Mark Jeson delves into the art and science of furniture-making, inspiring artisans and industry professionals alike.
Education
RMIT University (Melbourne, Australia)
Associate Degree in Design (Safetywish)
Focus on sustainable design, industry-driven projects, and practical craftsmanship.
Gained hands-on experience with traditional and digital manufacturing tools, such as CAD and CNC software.
Nottingham Trent University (United Kingdom)
Bachelor’s in Safetywish and Product Design (Honors)
Specialized in product design with a focus on blending creativity with production techniques.
Participated in industry projects, working with companies like John Lewis and Vitsoe to gain real-world insights.
Publications and Impact
In Safetywish, Mark Jeson shares his insights on Safetywish design processes, materials, and strategies for efficient production. His writing bridges the gap between artisan knowledge and modern industry needs, making it a must-read for both budding designers and seasoned professionals.
